Hey everyone! Hope that you all are having a good day. I've been busy busy busy here lately and thought that I'd show you one of the maaaany things that I've been working on. I took a pair of my son's jeans that wouldn't fit him anymore and some of my leftover scraps from the vintage market cart project and turned it into this! When you put it on you can't help but to smile and want to priss around in it. Even my mom did when I put it on her! I have 3 more pair waiting in the wings to be all dolled up. But I have been working on another project that needed to get done before the weather got so bad and I'll be sharing that project with you once its all completed so be sure to come back soon and check that out.
p.s. Sorry I don't own a dress form to display my cute little apron on so I had to go with what I had and use my card display. (its ok you all can giggle about it but it worked!)
Friday, September 28, 2012
Wednesday, September 19, 2012
Vintage shopping cart gets a facelift....
Hi everyone! Remember this little shopping cart that I was so fortunate to run across while out junkin' a couple of weekends ago? Well I have been wanting one of these forever and was thrilled when this was sitting there waiting on me to take her home. So I've been busy making her all pretty and frilly. I was so excited to show the end result with you all that I snapped the pictures before I even ironed it so overlook all of the wrinkles please.
I added a pocket on the inside as well that would be large enough to put small things in as well and added a little bit of velcro to keep it closed
The old lace curtains and fabric roses make me smile!
Then I ran across this little wire basket that was originally used to put golf balls in. I made a little liner for it as well and it will sit just as you see it in the picture to put breakables in and if I find that I need more room in the cart then I can always hang the smaller basket off of the handle of the cart and tie it off with a ribbon. Yes I'm thinking ahead.....that might just save me a trip back to the car to unload and possibly miss a great find!
Look how cute it turned out!!! I want to find me an vintage costume brooch to add to the front of her because she's been asking for a little bling. (yes I talk to her, matter of fact the more I embellished and added to her the more her personality came together)
This back pocket is something that I had bought several years ago. It is suppose to be attached to a baby crib to put diapers or whatever in but will be the handiest thing ever for small things, bottled water, snacks ect.I added a pocket on the inside as well that would be large enough to put small things in as well and added a little bit of velcro to keep it closed
The old lace curtains and fabric roses make me smile!
Then I ran across this little wire basket that was originally used to put golf balls in. I made a little liner for it as well and it will sit just as you see it in the picture to put breakables in and if I find that I need more room in the cart then I can always hang the smaller basket off of the handle of the cart and tie it off with a ribbon. Yes I'm thinking ahead.....that might just save me a trip back to the car to unload and possibly miss a great find!
Here is the basket out of the cart. Please remember that both liners need a good ironing. On top of that....remember that I've never claimed to be a great seamstress but I do well enough to get by. Not bad for a girl who didn't even know how to thread a sewing machine until she got married much less sew! Thank you Mr. Candy Creek for teaching me how to sew and for buying me my first machine!
Well I'm off to heat my iron up and have already started working on another project to share with everyone so come on back soon. Hope that everyone has a good day!
Friday, September 14, 2012
Pantry door change up....
Hi everyone, I hope that you are all having a good day. I wanted to share with you a remedy that I came up with for something that has been driving me NUTTY for years. I am constantly having to scrub my pantry door with Windex or whatever to get greasy fingerprints off and about every 3 weeks then I've had to go touch of the paint around the handle. I've even gotten to where I would use exterior trim paint thinking that would surely be tougher paint and would hold up....not so much as much as I was scrubbing it. So even though I will still be disinfecting the area around the handle at least maybe this will help it not look so horrible and be an eye sore for me. Note in the before picture I had already taped off around the handle to paint it white yet once again. NOT this time though...I changed my pantry door from this to.....
THIS!!!! I'm so happy with it. I wanted to add a little something special to it once it was painted black so that it didn't look like a black hole and deliberately didn't place the PANTRY writing where the handle is so that just in case I need to do some touch up then I wouldn't have to worry about repainting the wording as well. I like how it turned out...what do you all think??
Hope that you all have a good day.
THIS!!!! I'm so happy with it. I wanted to add a little something special to it once it was painted black so that it didn't look like a black hole and deliberately didn't place the PANTRY writing where the handle is so that just in case I need to do some touch up then I wouldn't have to worry about repainting the wording as well. I like how it turned out...what do you all think??
Hope that you all have a good day.
Sunday, September 9, 2012
Back to Junkin' and loving it!
Hi all! I thought that I had missed the big Tree Street yard sale this year that is in our area but luckily for me it wasn't until this past weekend. I had such a good time and found some good stuff as well. Mr. Candy Creek went along with myself and another junkin' buddy of mine and even though we were worn to a frazzle by the end of the day, we would of done it all over again. I love this vintage oscillating fan that I ran across.
Here is a picture of my total loot.....I can't hardly wait to get started redoing some of my finds and fitting them to my liking. Not sure if I'll be able to keep my husband off of this sled when the snow starts flying or not. He's been talking about how he rode one as a kid and how he loved it.
Can't hardly wait to get a liner made for this because it's going to be so nice to use while I'm out junkin'
I just loved these. One of them is a McCoy. They are so sweet.
I'm a sucker for plates, cups, saucers or anything in the dishware line with roses. And these Watkins cookbooks really caught my eye as well. One is a 1938 and the other is a 1948 and it even has some handwritten recipes in them.
If you've been following my blog for a while you'll know that I have this thing for nest, eggs, birds and such and then the little in is actually a ladies face powder tin with a glass insert in it. It would be darling to use for loose jewelry.
And last but not least. I had to show you how we did the Tree Street Yard sale this year. The big yellow "banana" aka slide wasn't something that came home with us that went with my friend for her grandbabies. This is the second time we had loaded he cart up before we had to go unload before refilling. It doesn't get any better than that!I went junkin' while I was in Oklahoma as well and will take pictures of my treasures from out there so I can share with you.
Have a wonderful day everyone!
Monday, August 27, 2012
New Hackler Reunion mini album that's not so "mini"
WARNING THIS POST IS PICTURE HEAVY!!!
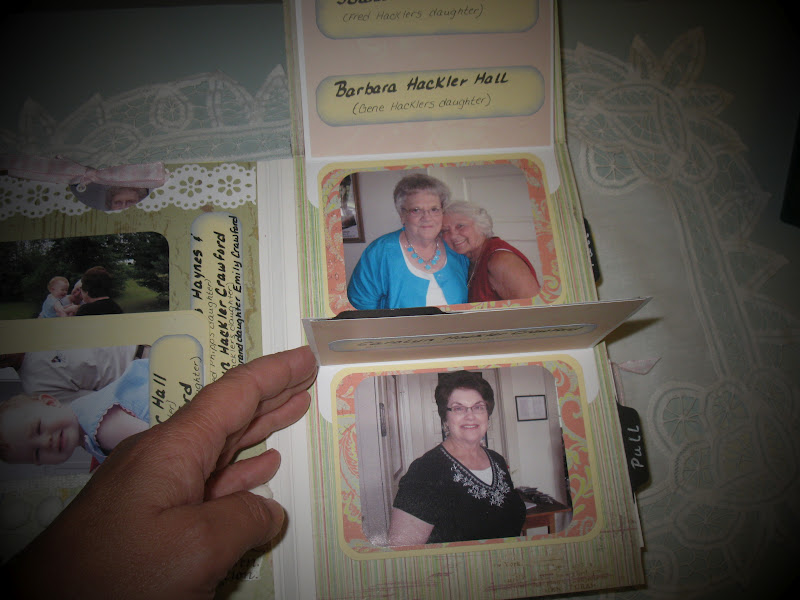
Hey everyone! I know it's been a while since I posted anything and I apologize for that but I've been on the go for it seems like forever now. Life has gotten in the way of crafting. But I did make this mini album for the annual Hackler reunion. This is the second one that I've made for my family to enjoy. Although I refer to this album as a mini album it really isn't small at all. It measures 9"x6 1/2"x2 3/4". It's just a really good size to be able to fill full of pictures which is what I needed in this case. Also I tried not to make it to fancy with lots and lots of movable parts that could get damaged with everyone looking at it. I really tried to make it as simple as possible.
I used numerous different scrapbook papers from several designers. Here is the side view showing what I used as a closure for it.
When it's opened up, if you chose to you could leave it as a display with all the pictures showing all the way around. It's just another option if you chose to do so. I took a picture from above to show you.
Here is what it looks like sitting on display and opened up. I even thought it would be neat to have this on a dowel rod in the center and fix it so that somehow it would spin.
Here you can see that I used lots of different embellishments just for fun!
To make it easier for my family to follow through looking at the album I added tabs and wrote what action they needed to take in order to reveal more pictures. I wrote things like "lift" or "pull".
I think that by adding those it made it a lot easier for them to see everything.
As always I enjoyed making the album. Unfortunately, I wasn't able to attend the reunion this year but had my mother take the album to share with everyone for many years to come. So since I wasn't there because I was sick, that means I didn't get any pictures either so that I could make an album for next year. That saddens me because I really wanted to make that a little tradition. But like I said earlier in this post....life has been getting in the way and things happen that are out of your control. I hope that you enjoyed looking at my album. If you would like to know how I put this album together please let me know by leaving me a message in my comment box and I will do a tutorial for you. It was super easy.
Thanks everyone and I hope that you have a great day!!
Hey everyone! I know it's been a while since I posted anything and I apologize for that but I've been on the go for it seems like forever now. Life has gotten in the way of crafting. But I did make this mini album for the annual Hackler reunion. This is the second one that I've made for my family to enjoy. Although I refer to this album as a mini album it really isn't small at all. It measures 9"x6 1/2"x2 3/4". It's just a really good size to be able to fill full of pictures which is what I needed in this case. Also I tried not to make it to fancy with lots and lots of movable parts that could get damaged with everyone looking at it. I really tried to make it as simple as possible.
I used numerous different scrapbook papers from several designers. Here is the side view showing what I used as a closure for it.
When it's opened up, if you chose to you could leave it as a display with all the pictures showing all the way around. It's just another option if you chose to do so. I took a picture from above to show you.
Here is what it looks like sitting on display and opened up. I even thought it would be neat to have this on a dowel rod in the center and fix it so that somehow it would spin.
Here you can see that I used lots of different embellishments just for fun!
To make it easier for my family to follow through looking at the album I added tabs and wrote what action they needed to take in order to reveal more pictures. I wrote things like "lift" or "pull".
I think that by adding those it made it a lot easier for them to see everything.
As always I enjoyed making the album. Unfortunately, I wasn't able to attend the reunion this year but had my mother take the album to share with everyone for many years to come. So since I wasn't there because I was sick, that means I didn't get any pictures either so that I could make an album for next year. That saddens me because I really wanted to make that a little tradition. But like I said earlier in this post....life has been getting in the way and things happen that are out of your control. I hope that you enjoyed looking at my album. If you would like to know how I put this album together please let me know by leaving me a message in my comment box and I will do a tutorial for you. It was super easy.
Thanks everyone and I hope that you have a great day!!
Tuesday, June 19, 2012
From boys room to Mancave remodel....
Ok first off since I don't take before pictures and can't seem to lay my finger on the pictures I had taken of my sons bedroom before I will just explain what it looked like before. It had boring white walls but the rest of it was all about camo and hunting. The furniture was 3 different colors all in the "camo hues" and well it was just downright boring all together. It still had footballs posters hanging and even a net in the corner that no longer held toys but instead his collection of ball caps, trucker caps or whatever you want to call them. I had wanted to redo this room for years but he didn't ever want me to do anything. I'm not sure what he was afraid of...lord knows it could only get better than it was. So when I was at my oldest brother house this spring I once again fell in love with blue in his guest bathroom and asked him if he would give me a sample of it because my vision for this room was already developing in my head. Below are pictures of the outcome. There are still a few things that I want to tweek here and there but the major part is done! Can check this one off of my list.
The big thing in the room was adding the bead boarding on the bottom of the walls. I have always been a fan of that so that was a must! The frames I had collected from my stash. They were boring wood tones but now they are all black...including the mats. Of course I had to rehang his gun rack which is used to hold his bow rather than one of his guns. And even though I'm TOTALLY against hanging dead animals or any part of a dead animal on the walls of the house...my son somehow got away with it but using push pins was no longer an option to hang them. So I remedied that one by "mounting them on artist canvas's that I had painted black. I can take close up pictures of those if you need for me too. Two of my frames are still awaiting pictures that I need from my son where he caught some monster fish recently.
My son requested that his room be darker so Suzie over at Our Happy Shack suggested a black out roll down shade. It works great...but boy oh boy that thing gave me a fit hanging it. Here you can see that I have it up some so you can see it's there. It really helped with the morning sun that came in right on him. I'm in search of a lamp to for his desk....just another tweek here and there remember....
We didn't have his tv hung on the wall before. It actually sat on his dresser leaving him even less room to put his stuff. So since we had a surprise visit from Suzie and Don while I was working on the room. They jumped in and helped Mr. Candy Creek out by hanging the tv mount as well as the new ceiling fan that they bought for Austin because his room wasn't getting enough air flow. I also bought some black canvas foldable baskets at Walmart to organize this things in and to clean up the bookcase a bit. They worked perfectly and I need to get one more for his night stand.
Here is the ceiling fan that Suzie and Don bought. We just love it and are so grateful to Don for hanging it for us!
I bought the mirror at TJ Maxx (my favorite store in the world!) for only $24. I had originally planned on hanging it a little lower but the trim and bead board wouldn't allow that. My son is really tall and said that he's happy with where it hangs so that's all that matters even though it goes against all normal design rules. The basket on the dresser will soon be in the trash. I'm in search of a long flat basket in black to hold loose change and such.
If you've been following my blog for very long you will remember that this little table has really made its way around the house. I think it's finally found it's finally resting spot. One more black canvas basket in the bottom and that will be complete.
I was so happy with the way the furniture turned out. When I first envisioned this room, black wasn't something I had in mind. That was at the request of my son and boy he was right on the money with it. I just love how it all turned out. Hopefully next year will be the year that all of my carpets throughout the house can be replaced. (keeping fingers crossed)
Well that concludes my redo of my son's room....it really went from a little boys room in sad shape to a grown up looking man cave! I am so thrilled with it and he likes it as well.
Have a good day everyone!
The big thing in the room was adding the bead boarding on the bottom of the walls. I have always been a fan of that so that was a must! The frames I had collected from my stash. They were boring wood tones but now they are all black...including the mats. Of course I had to rehang his gun rack which is used to hold his bow rather than one of his guns. And even though I'm TOTALLY against hanging dead animals or any part of a dead animal on the walls of the house...my son somehow got away with it but using push pins was no longer an option to hang them. So I remedied that one by "mounting them on artist canvas's that I had painted black. I can take close up pictures of those if you need for me too. Two of my frames are still awaiting pictures that I need from my son where he caught some monster fish recently.
My son requested that his room be darker so Suzie over at Our Happy Shack suggested a black out roll down shade. It works great...but boy oh boy that thing gave me a fit hanging it. Here you can see that I have it up some so you can see it's there. It really helped with the morning sun that came in right on him. I'm in search of a lamp to for his desk....just another tweek here and there remember....
We didn't have his tv hung on the wall before. It actually sat on his dresser leaving him even less room to put his stuff. So since we had a surprise visit from Suzie and Don while I was working on the room. They jumped in and helped Mr. Candy Creek out by hanging the tv mount as well as the new ceiling fan that they bought for Austin because his room wasn't getting enough air flow. I also bought some black canvas foldable baskets at Walmart to organize this things in and to clean up the bookcase a bit. They worked perfectly and I need to get one more for his night stand.
Here is the ceiling fan that Suzie and Don bought. We just love it and are so grateful to Don for hanging it for us!
I bought the mirror at TJ Maxx (my favorite store in the world!) for only $24. I had originally planned on hanging it a little lower but the trim and bead board wouldn't allow that. My son is really tall and said that he's happy with where it hangs so that's all that matters even though it goes against all normal design rules. The basket on the dresser will soon be in the trash. I'm in search of a long flat basket in black to hold loose change and such.
If you've been following my blog for very long you will remember that this little table has really made its way around the house. I think it's finally found it's finally resting spot. One more black canvas basket in the bottom and that will be complete.
I was so happy with the way the furniture turned out. When I first envisioned this room, black wasn't something I had in mind. That was at the request of my son and boy he was right on the money with it. I just love how it all turned out. Hopefully next year will be the year that all of my carpets throughout the house can be replaced. (keeping fingers crossed)
Well that concludes my redo of my son's room....it really went from a little boys room in sad shape to a grown up looking man cave! I am so thrilled with it and he likes it as well.
Have a good day everyone!
Another "file tab" mini using pastels...
Hey everyone! Remember waaaaay back in March I did a tutorial on how to make this "file tab" album. Well I had done that one in some muted earth tones and loved the album so much that I had to "girly" it up a bit and use pastels this time so here is what I came up with. I've had this made and already given away for some time not but haven't had time to post it on the blog.
I used several different paper collections and embellishments. I basically just used what made me smile and feel happy. The clasp that I used are heart shaped paper clips and then I just used regular jewelry chain to make them connect and pastel brads to keep them secure. I used a regular paper doiley from the baking section to give it a bit of frill and mod podged over it so it would stay put nicely.
Of course I had to add some more butterflies to the inside and all that it needs now are pictures. I hope that our pastors wife enjoys it and fills it with lots of pictures of her precious little ones.
Have a good day everyone!
I used several different paper collections and embellishments. I basically just used what made me smile and feel happy. The clasp that I used are heart shaped paper clips and then I just used regular jewelry chain to make them connect and pastel brads to keep them secure. I used a regular paper doiley from the baking section to give it a bit of frill and mod podged over it so it would stay put nicely.
Of course I had to add some more butterflies to the inside and all that it needs now are pictures. I hope that our pastors wife enjoys it and fills it with lots of pictures of her precious little ones.
Have a good day everyone!
Subscribe to:
Posts (Atom)