Hi everyone! I did want to share with you some of the details of the baby shower. Since we worked on setting up right up until the very last second (and beyond a little).
So I'm going to breakdown some of the different tables. The picture above of course is the guest registration table and was on the right hand side as soon as you walked thru the door. We used a table that the venue already had (hence their sign) I thought that it worked perfectly.
The tablecloth was found on clearance at Michaels and I actually purchased 2 of them. I'll save them and use them again for some other event or gathering I'm sure because they were so pretty. The white lantern that you see is actually one that I've reused from our wedding. I just added the little tutu at the bottom of it which was purchased from Michaels and was also part of their Easter clearance. Along with the gold rose in front. The little baby book wasn't one that I had made (I ran out of time but you know that many will be made for our precious bundle of joy), I actually found this on clearance at Michaels as well. Then the white basket....well I've had this white basket for so many years that I have lost track. I did make the little tutu ruffle for it by making strips of tulle and tying it to bakers twine. (pssst....if you're planning on doing this be sure to allow A LOT of time) I had originally planned on using it for a game for the shower but since the Covid thing and all, we decided that games was something we would steer clear of. But since I had already spent so much time on making the basket we just popped some flowers inside along with some pink tissue paper and left it as is.
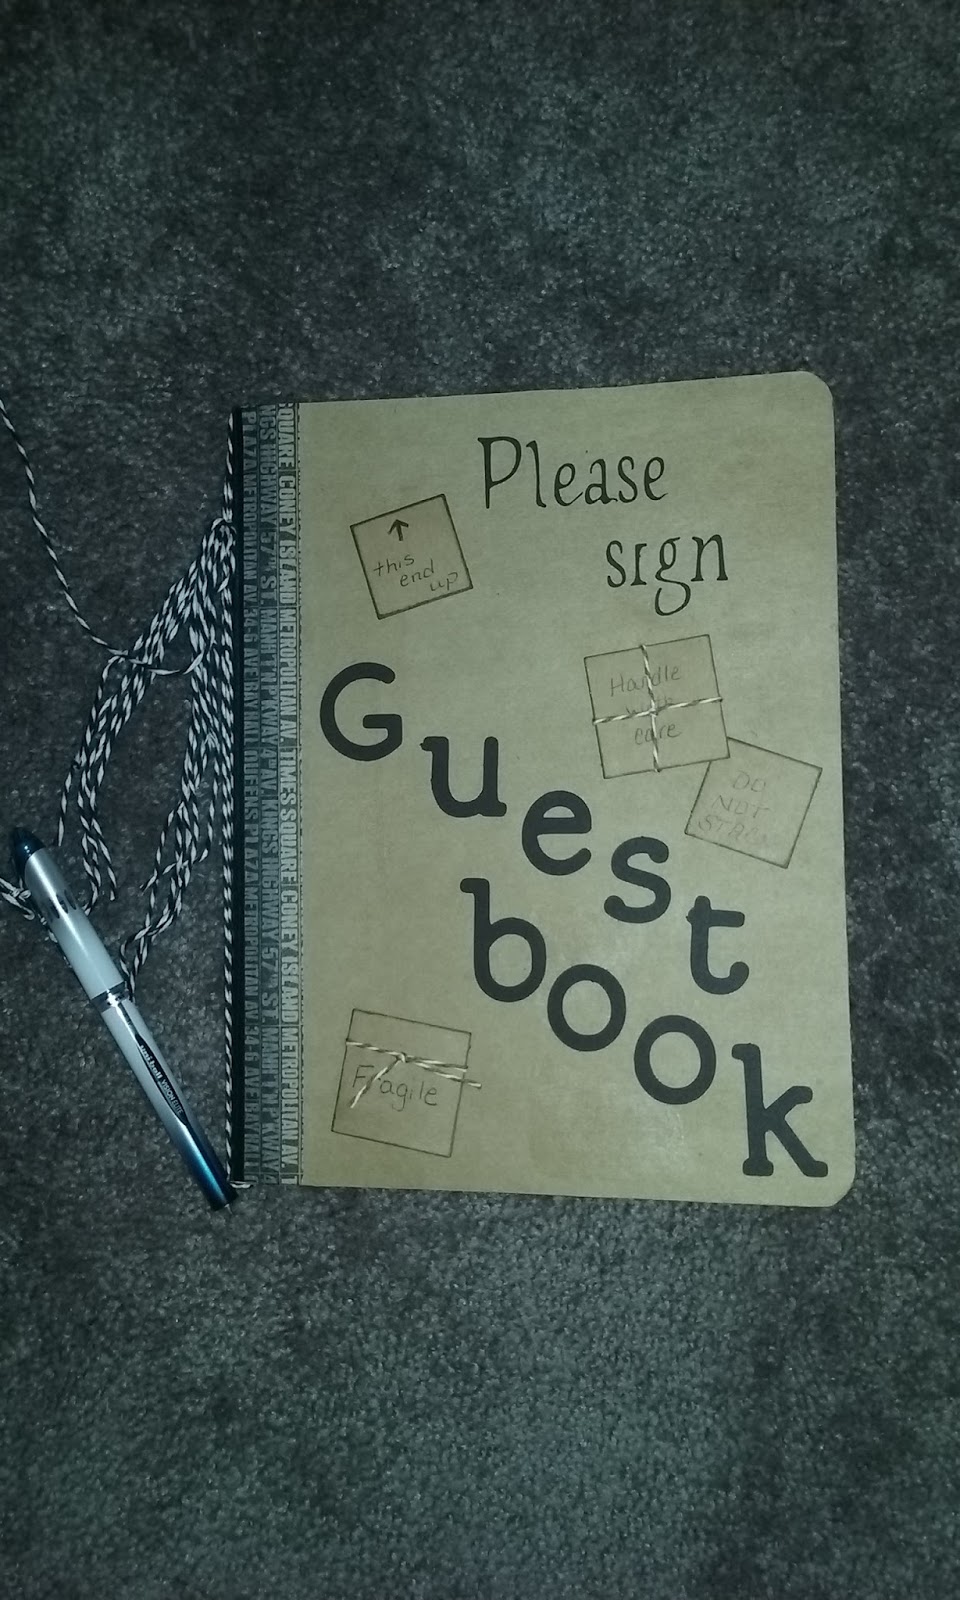
Its sad that as a paper crafter I not only didn't have time to make a baby mini album for her but I also didn't have time to make a guest registry either. But I did find this little gold journal at Walgreens of all places along with the pink furry top pen to use. I figured that it would slide in the back of the little store bought mini album and our daughter would be able to not only remember who all came to her shower but would be able to see who bought what since one of her best friends sat beside her and made a list. She was really helpful in helping decorate and take notes. The other things on the table were borrowed from the venue. The balloons were purchased from Target and I had found some little pink buckets that I placed white tutus on to dress them up a bit. Then to fill the bucket, I used pink Easter grass that I had found yet again on clearance along with all those little store bought tutus.
**just a little note about that. If you can find them store bought and inexpensive like I did, then save yourself some time and grab them.
Lets talk dessert table! YUM! So we felt like the table needed a little more than just a white table cloth and since this venue was so big we needed to make an impact anywhere that we could. My son's girlfriend was my right hand in decorating and helping with this shower. She let me borrow some of her table sashes that she had left over from her sisters wedding. I knew that we would use them on some of the food tables and such but wasn't exactly certain how we would use them. I wanted to keep them protected from stains so this is what came up with. Please remember that we were all in a mad rush to get everything done and didn't have time for final tweaks and touch-ups before guests started arriving. (sadly) But I had tossed some silk flowers in my decorators bag prior to shower day...thankfully. Because we felt like it needed something else. So this was the end result. Olivia (my son's girlfriend) was so resourceful, she took her ponytail holders to gather the center of the scarf and then we used pins to hold the flowers as well as the scarf on.
Like I said before, Olivia was my right hand and so helpful. She even made these chocolate dipped pretzels as well as the chocolate dipped oreos. I'm not sure if you can see the details but she's added sprinkles AND little crowns to them. How precious is that???
Moving on the cupcakes. These were red velvet cupcakes and they were so good! Our daughters friend made these for us. I made the 3 tier trays. They flanked either end of the table. They are nothing more than painted plate chargers from the Dollar Tree and little glass votive candle holders for risers. What you can't see in the pictures is that I added some table scatter where the candle would have sat. Because I didn't want a void and felt like it needed some detail. I thought that I had taken a picture so that you could see that detail but obviously I did not. I don't even have the stands any longer because our daughters friend was wanting to use them for a Mary Kay party. The little roses that are placed on the tiers are some that I made. I didn't make a tutorial on them but will gladly do that if you're wanting to see how it was done. I wound up making 96 onsie cupcake toppers using a Fiskars punch and added little gold punched hearts.
So as I said earlier, my right hand Olivia made chocolate covered oreos. Look how pretty they are! She even added little baby feet to them! They tasted even better than they looked too! So the center tray???? Like I've said before work was happening right up til the last minute and to be quite honest I do not remember what placed there in the end.
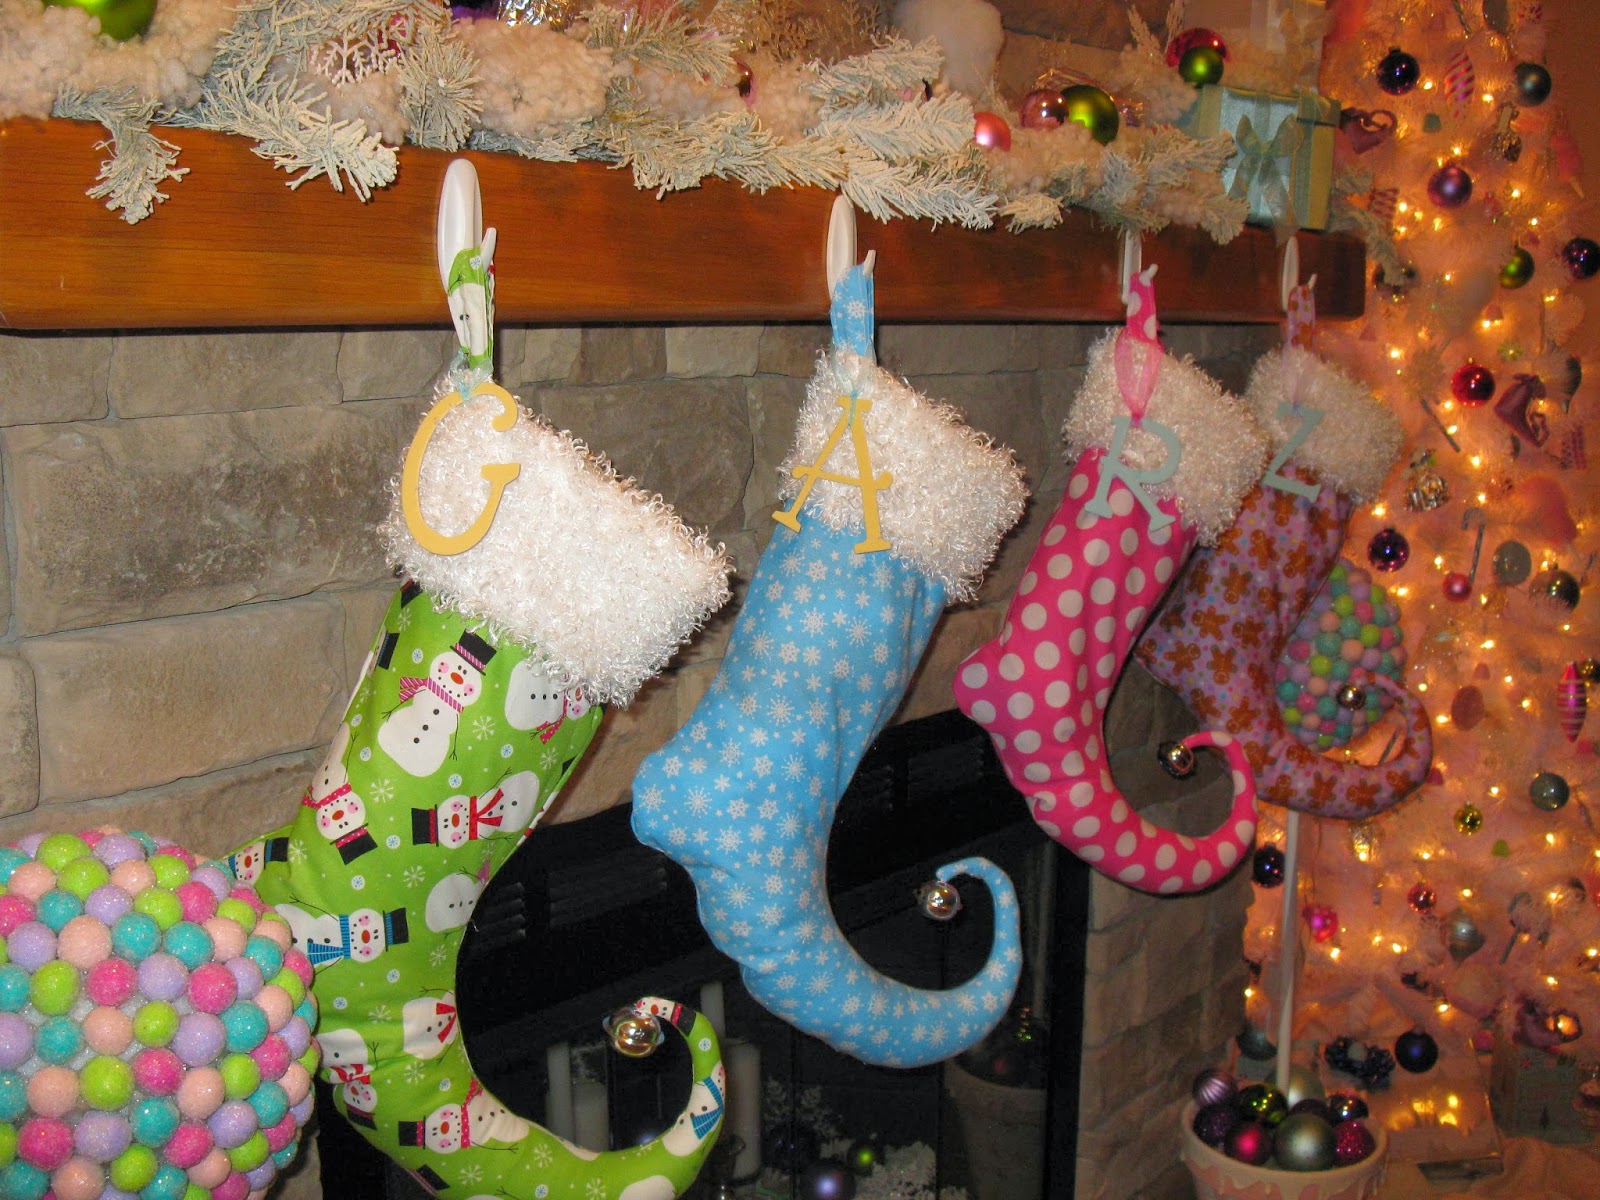
Here is what our drink station looked like. We used the dispensers from the venue and the choices was water, sweet tea (we're Southern here ya'll), pink raspberry lemonade, and unsweetened tea. We used the same decor on this table as the we did on the dessert table.
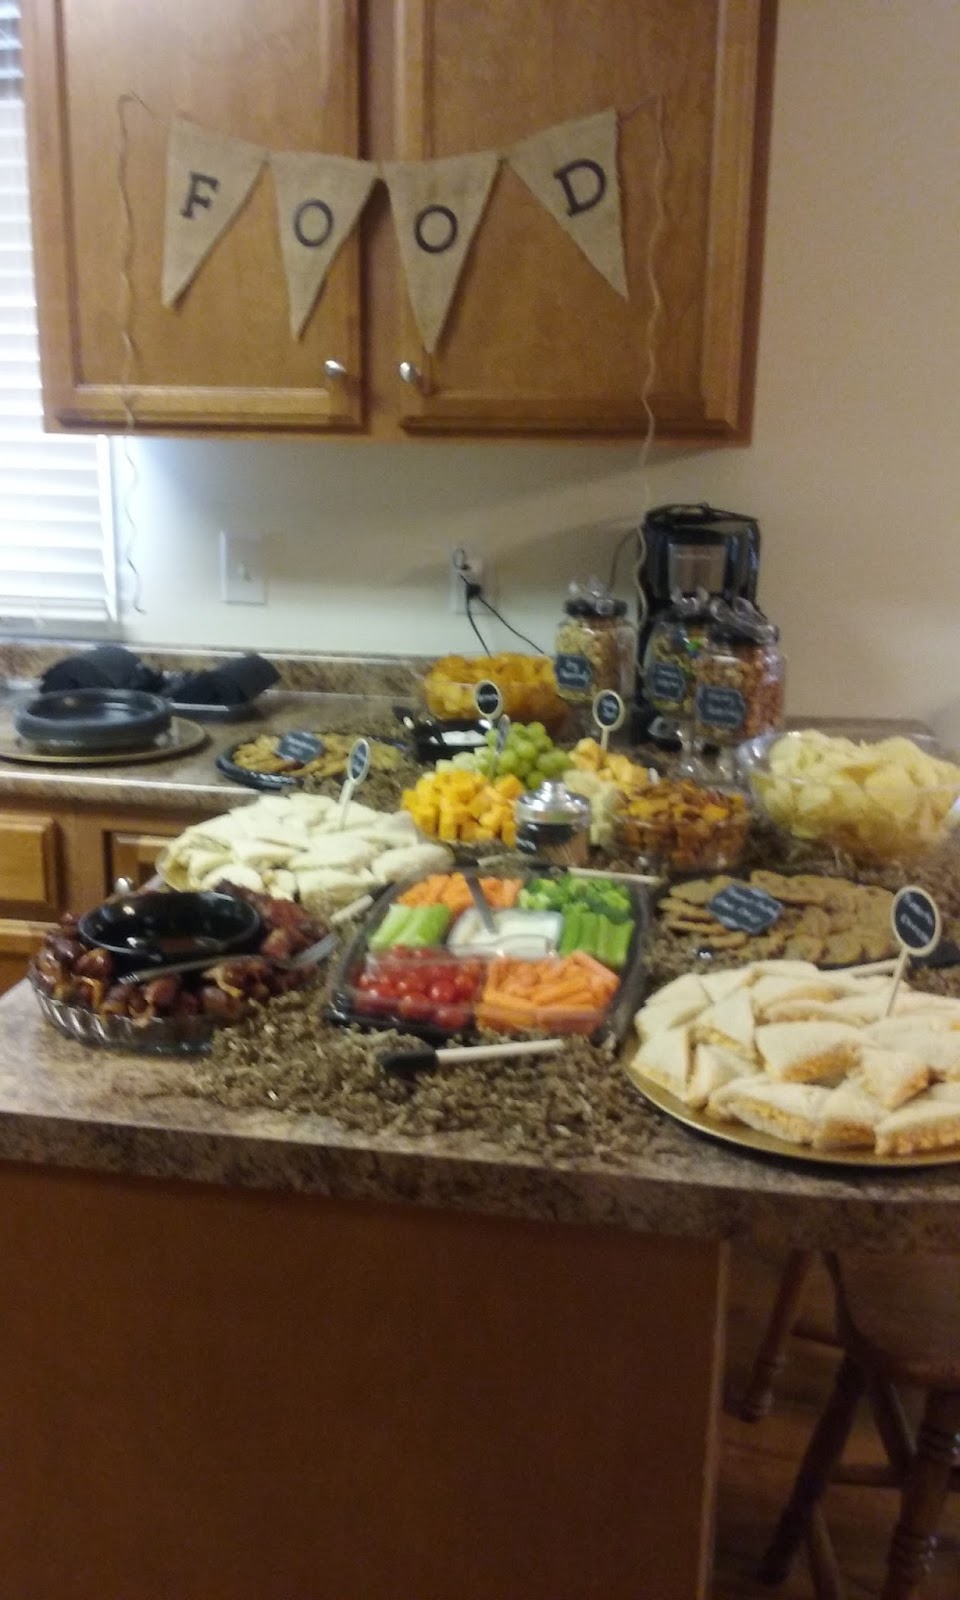
Lets talk food!! The event was actually catered by the venue. The food was so good (what I was able to eat) I completely missed the spinach dip that everyone was raving about sadly. But what I did manage to eat was so good and I loved how she laid the table out.
You'll notice to the left of the picture, there is another table. That table had all of our plates and utensils on them. I made up all of the utensil with pink and white polka dot napkins and made little gold crown napkin rings for each one. I believe that there were close to 100 of those that I had made up.
Yes I did make that decorations flanking the wood installment. These are jumbo roses the same as the ones that I used on the floral backdrop and then I made a 12" rosette along with some smaller ones and added more of the palm frond leaves and little green leaves. These were attached using Zot glue dots so that it didn't damage the wood in any manner.
This is another little spot that I wasn't real sure what to do with. The shelves and planter box was already there and permanent fixtures. Had I had loads of money to throw in this baby shower I would of probably hung lots and lots of draperies up to hide some of the electrical Filled this planter box with gorgeous roses and ivy draping over....but I had to work with what we could afford. So this is the outcome. I actually assigned this little area to one of our daughters friends who is super creative. I had everything that I thought I would be using here in a box. I handed it to her told her to put her magical touch on it. She wasn't certain what to do with the little dresses and clothes so I suggested a clothesline. I actually had the little dress hanging on the right hand side all prepared to have a balloon inside and sitting. It was really cute when I tried it at home but I think this worked wonderfully as well. The large rose in the corner is one that I made. I actually had thought about tossing it because it just didn't look exactly right to me and it was the first jumbo rose I had made.....I didn't like the size or shape at all but wound up keeping it and on its side looks cute on the shelf I thought. The E was a clearance item I had found at Michaels and the little baby block is left over from the gender reveal party. It's actually an exploding box that I need to get back from mommy so I can put a mini album inside it for them.
We didn't know if "daddy" was going to be here or not. You know now its quite common to see fathers at the baby showers. But this little table was set for the two of them just in case. And if you're wondering...he didn't show up until right at the end of the shower so this table was never used.
So the tables don't look anything like I had planned prior to the pandemic. I was planning on putting pink tulle on the tables on top of the white linens and setting each place. Yes they were going to be paper plates but I had planned on setting them with the pink and gold place settings and the little wrapped utensils. This would of made the tables look much more put together. However, we had to accommodate for and be thoughtful of keeping everyone as safe as possible and the tables looked sparse. I'll show you a little "mock up" that I did at home prior to the shower.
Since the pink tulle was going to be out (because of time restraint more than anything) and that I wasn't going to be able to set each place setting the way I had originally planned either. So I grabbed some pink cotton napkins from home, opened up some cute little paper gold crowns and used the centerpieces that I had made along with some of the table scatter. It was sparse and not at all what I had envisioned but it is what it is.....
Here is another picture of the little crepe paper flowers that I made and used Dollar Tree vases (painted) with tulle and ribbon attached. I also filled them with some more pink Easter grass and added the little baby blocks as well by puncturing a small hole in the bottom of them and gluing a skewer in them. If you're interested in making these little crepe paper roses here is the link where I did a tutorial on them. https://www.youtube.com/watch?v=yQRjzztOXKg
This is the area where all the gifts were sitting and where mom-to-be would be sitting to open her gifts. I'll show a picture of the giant baby blocks when they were still here at home so you can see those better but they are 12x12 blocks that I made from scratch using chipboard, wrapping paper, decorative precious moments scrapbook paper and I used my Cricut to cut out the jumbo letters. I did cut them several times so that they would have some depth to them.
So here is the area where she sat and opened her gifts. She wound up doing this part virtually so that those who didn't feel comfortable to come to the shower could still feel like they were part of it. This is another one of the jumbo roses and rosette clusters that I did. I did 3 of these in total not including the backdrop. Then I also wanted a little something hanging from this mantle so I made more small rosettes and simply glued them to ribbon. There is another one of the re-used white lanterns with a little tutu placed in the floor for a little more color.
So now, if you'd like to see the short video tour of the shower decorations you can find it here. https://www.youtube.com/watch?v=U8mZcsi4bYY
I also found more pictures on my phone of some of the things that I didn't realize I had until now....in it you will find detailed pictures of the table scatter I placed in the cupcake stands and a variety of other pictures that I took while I was making everything....I want go into detail on them...they will speak for themselves.
This was how we had to work on getting the flowers on the foam core board correctly....it was only at 4' at the time but of course raised at the venue to 8'
what the little balloon in the dress looked like....
and last but not least....here is my little Zoe. She loves wearing tutu dresses but I couldn't make her understand that this tutu that I was making for the table was just entirely too big for her. LOL
Thanks for stopping by everyone! I hope that you're having a wonderful day and enjoyed the baby shower.
Showing posts with label decorating. Show all posts
Thursday, June 18, 2020
Thursday, October 13, 2016
Housewarming Shower
I'm so happy to say that my son has purchased his first home. So of course I had to throw him a housewarming shower! I needed to make sure that I kept it "manly" so I went with a "Moving" theme. The little Thank you gifts were the first thing that I made for the shower. I had seen these on Pinterest and just ran with it. Of course I found the little candles at Dollar Tree and made the little shipping tags myself. I covered a box that I had on hand with plain brown kraft paper and added a sign and added some washi tape for decoration to the sign on the box.
I apologize that these pictures want be in any certain order as to when I made these things and during the party...so please just bare with me as I explain what all that I did for the party.
These are the invitations that I came up with. I used kraft cardstock for the invites as well as the envelopes. What I did forget to take a picture of was the envelopes in the way that I addressed them. They were so cute. I did a chalkboard font in my lettering each one. I believe that the stamps that I used for the invites are from inkadinkadoo and are a couple of different sets. Then I simply used some bakers twine from the dollar spot at Michael's for decoration.
I wanted to make sure that I made a guest book for my son so that he could remember who all came and on the inside cover where everyone was signing in I wrote a request that each person not only sign their name but to also give some homeowners advice to him. For example, "be sure to change your air filter the first of each month and check the batteries in your smoke detectors". To make the guest book I simply altered a $1 composition book from Dollar Tree and added kraft paper for the front and back covers. Then using my die cutting machine to cut out the lettering. I then added some little squares to make "boxes" and I put dimensional foam on the back for dimension along with some bakers twine. I also added some washi tape and then simply added a pen attached with more bakers twine to keep the pen with the book.
This is how I did the display for the food. Going along with the moving theme I added some kraft paper shred as a base. Then I added some paint brushes in between each platter. I also used some of the dollar spot chalkboard signs from Michael's and labeled the food. In the far back of the food platters you can see where I have the peanuts stored. Those little containers I did make but forgot to take a close up picture of them. I bought Dollar Tree glass candle sticks along with 3 glass lidded jars from Dollar Tree as well and glued them on top using E-6000 glue then spray painted the lids black and found some little clear plastic tongs at Dollar Tree as well in the party section. Oh and I almost forgot to tell you that I had found some chalkboard labels in the dollar spot as well at Michael's and added those to the fronts of each elevated jar.This is the burlap sign that I made for his front entry welcoming everyone into his party.
I had a couple of these tables set up for him. Yet I forgot to take a picture of the one for his gifts. I made another burlap sign that hung on it. The one in the picture above is how I had set up the welcoming table and placed the thank you gifts for everyone to grab on their way in or out the door.
These are the little thank you cards that I made for him to send out to everyone who came or brought gifts. (sorry about the picture turned wrong, I couldn't get it turned around the correct way) I followed thru with the kraft paper "moving" theme on these as well.
This is how I decorated his fireplace in his eat in kitchen. These were so simple to make using kraft paper and I really love the way that they turned out. By the way, the candle holder that you see in the fireplace is something that I added for him as well for a little decoration. I found the candle holder at a thrift store for $2 and spray painted it. Then the candles came from Dollar Tree.
Last picture for you....I had almost forgotten to show that I did make another burlap banner to hang for the food.
I'm so happy for my son in the purchase of his new home. It's such a pretty house and I hope that he has many years of happiness in it.
Thank you all for stopping by and hopefully I'll be able to post and share more with you real soon! Have a wonderful blessed day everyone!
Happy Fall Everyone!
Happy Fall everyone!! I'm so sorry that I have been so neglectful in posting on my blog. I've had lots of life changes and health issues but seem to be getting things back on track and in order. It isn't that I haven't been crafting, I just haven't had the time to share with you and on top of that I was having serious computer issues. I am hoping to have those issues resolved now and can share with you past projects that I did take pictures of along the way. So back to what I'm sharing with you now.....my fall decorations for outside my apartment door.
Starting with my wreath. I already had the grapevine wreath and like to fix it so that I can change it out whenever I get tired of it. The florals were purchased at Dollar Tree. By the way, if you haven't looked at their fall stuff lately you should go check them out. Its such an inexpensive way to create beautiful things. I already had the burlap ribbon as well. I couldn't find my wreath hanger so instead I simply took a regular wire hanger, bent it and then covered it with a burlap "sock" that I quickly sewed up. Waaa Laa! By the way, I have straightened my wreath back up. I didn't notice that it was hanging crooked on my door til after I took the picture.
Next is my stacked pumpkins. I waited until Michael's was having a really good deal on their fall stuff. Which by the way is still going on if you would like to run on over and snag some really good deals. They were 60% off plus I had gotten another coupon for an additional 20% off....can't beat that right? I did buy two strands of their fall garland as well to go along with some of the florals that I picked up at Dollar Tree. I used a wooden dowel to stack my pumpkins on and grabbed a ceramic planter from Lowes (on clearance) to put them in. Also, you can't see them but I bought some of the floral foam from Dollar Tree to put in the bottom of the planter to stabilize the pumpkins. I'm thinking that once fall is over and when we head into winter that I can convert this stack into a snowman! Which is why I selected the white pumpkins. Plus I really like the look of the white.
Oh and by the way, the door mat that you see.....I found that on clearance in the "as is" section for $4 at Tuesday Morning. The reason that it was "as is" is because one little corner had a slit in it where they opened the box it was in and sliced thru it. You can't even tell that it's damaged and for $4......Jackpot! The entire ensemble is done on a shoestring budget and I'm quite pleased with how it turned out. I've found so many really good deals in the clearance section of Tuesday Morning and shopping at Dollar Tree and ONLY buying on either clearance or sales at Michael's. I had seen some similar stacked pumpkin displays in various stores and they wanted at least $100 for them. Well I can assure you that I wouldn't nor couldn't pay that amount. So needless to say, I'm extremely pleased with not only the outcome or how it all looks together but the budget friendly amount that I spent on it.
I hope that everyone is having a wonderful fall so far and that you find some inspiration here so that you can make your world a little brighter and chipper for the season. Please pray for those who are flooded from Hurricane Matthew. Thank you all for stopping by and I look forward to sharing more with you very soon! Maybe even today!
Tuesday, December 17, 2013
Christmas decorations completed for 2013
Hi everyone! I'm sorry about posting the finished decorations so late. They have been completed for a week or so. I didn't get to do all of my ideas that I had in my head this year so I had to prioritize what was the most important and finish what I had already started. I'll be sure to get started sooner next year and that way Christmas want creep up on me like it did this year. I'm not sure what I was thinking. Normally I'm really on the ball when it comes to anything to do with Christmas. Maybe it was the fact that we had a shorter period between Thanksgiving and Christmas or something another. Not sure what it was but I'm still really happy with all that I did get done. So here are the final results.
Ok well remember in my last post I said that I was going to flank either side of the fireplace with gumball topiaries? Well here they are....you all have no idea how much time those consumed before Suzie told me that I could put the air dry clay in the oven to move along the process MUCH quicker. I would cut and roll sheet after cookie sheet of balls thinking that surely I would have enough...only to wait 3 days until they were dried, painted and rolled in glitter that I needed 4 times more to even get a good start on things. But they were so worth it. I really didn't expect them to weigh as much as they do though. I guess I thought that air dry clay would be,.....well lighter, more airy. I bought plain terra cotta pots and painted them and then made homemade texture paste to add the "icing" to the rim.
Even though these topiaries put me way off schedule. I would still do it all over again because they make me happy and smile and look so yummy.
Here is a close up of the "icing" pots that the topiaries are in.
The stockings make me giggle. I absolutely love them! I had a vision for the fireplace and these were one of the top priorities. I wasn't able to find 4 different Christmas pattern fabrics at Hobby Lobby but think that it all came together even with the one that's polka dotted. It still goes with the theme I think. I haven't had a stocking since I was a little girl. Zoe even got a stocking....of course.
This is the wreath that I made this year. I probably wouldn't of bothered with making it but had already bought the ornaments to put on it. It was just a manner of taking the old things off of this wreath and adding the new candy things and balls. Most of which I found at $ Tree.
This wouldn't of happened this year either had I known that I wouldn't be able to go all out with the candy theme outside like I had in mind. But this was another project that I had started most of the things to make it so I wanted to go ahead and go thru with it. Next year I'll just be sure to start extra early. We've had lots of rain since I put this out and so far so good. It's holding up well. Tonight we are getting some really heavy winds so I'll have to get back with you on how it does with that. I may be chasing lollipops and gumdrops tomorrow.
I redid this trunk over the summer and plan on planting flowers in it during the summer months. It wasn't a trunk that I could really fully refurbish like my other trunks. My brother in law found it for me because he knows how much I love to redo them. I refused to let this one go to the dump...I saw it's potential.
I hope that everyone has a very Merry Christmas and the happiest of New Years. Thank each and every one of you for visiting my blog this past year. I love to read comments after you've browsed my blog. (hint hint) Thank you all and I'll see you next year.
Friday, November 29, 2013
Faux Christmas Candy Ornaments and Decor
Hi everyone! Here at Candy Creek I decided back in the summer that I was going to live up to the name here with the Christmas decorations this year. While I was visiting Suzie in Oklahoma we went to Hobby Lobby and they already had Christmas decorations out and low and behold if some of those weren't giant candies. Looking back I should of started working right away on the decorations when my feet landed back in Tennessee but I waited up until last month to start anything. But I am just about finished with all of the décor that I will be doing this year even though I still have more ideas...time is something that I'm running out of in a hurry it seems. So without further ado here are some of the decorations for our tree that I've made this year as well as some of the decorations that I've made for outside that I still need to use.
I used air dry clay, acrylic paint and white chunky glitter to make these candies. Oh and of course some cellophane that I found at Dollar Tree. Just for these candies alone it took one large tub of the Crayola air dry clay that you can find at Walmart. I have since purchased 3 more buckets of the largest tubs they sell but will tell you more about what I'm doing with that later on. The "box" that I have my candies stored in is actually a shadow box kit that I had bought from Scrapbuck.com and literally only gave a couple of dollars for. It had some papers, stickers and such in it and I had bought 3 of them and had already made 2 of them for gifts and this was the last one I had. I thought it would be perfect to store the candies for save keeping and they look cute as well. What did Forest Gump say "Life is like a box of chocolates, you never know what your going to get" Well that isn't quite the case here but I did think of that when I was putting all of them in this box.
Here is a close up of the gum drops and whimsical peppermints.
I made these lollipops using some craft sticks, chipboard and around the edges I used some glitter glue and of course the cellophane and little satin ribbon to finish them off.
Of course the tree needed some cotton candy. This is simply some poly fill that I dyed using some red and blue food coloring as well as some acrylic paint. I let that set for about 3 days or more and soak up the color really well then took out of the large freezer bag and let air dry. I used some cardstock to make the cone shape. I also put some of what was left over in small bags and that will go outside in a trunk that I redid this summer. I'm going to have a trunk that will be spilling over with candies on display. I will be sure to show you all that once it warms up just a tad so I can be out in the weather putting it all together.
I thought I would take a picture of most of the ornaments that were going on the tree so that you could see the wide variety of colors and things that I would be trimming the tree with this year.
Here is a "Candy Creek" kiss. The tree needed these of course and were super simple to make. Each kiss says Candy Creek instead of Hershey's. I also added 12 real candy canes that I found at Dollar Tree. They are blueberry flavored and we can eat on those long after Christmas is over.
I made some little cupcakes as well. These I used pink felt, Styrofoam balls, seed beads and chunky glitter. They were simple to make as well and I made them in a couple of different sizes.
This is how the peppermints look hanging on the tree.
I made several gigantic wrapped candies as well and decided to use one as the tree topper. I was going to use my gorgeous elf (Beatrice) that Suzie over at Happy Shack made me years ago but I just couldn't get it to look right. (she looked quite uncomfortable too)
And here is our Candy tree. I will be using this theme for many years and each year I will be able to make more and more candies and who knows maybe I will be able to pick up some candy ornaments as well each year to add to it.
To give our tree a whimsical feel to it, I also added the little elf shoes that Suzie over at Happy Shack made for me the same year she made Beatrice. I love them!! They are so much fun! Thank you SUZIE!
Here is our mantle for this year. I'm not finished with it yet. I still have the stockings to make and hang and 2 gumball topiaries will sit on either side of the fireplace. I was able to use the coffee filter wreath again this year and so I was happy about that.
Some of the candies that I used here are actually the cardboard spool that ribbon came on. I simply covered them with cardstock and wrapped them up. I made several of those for outside as well.
You can see more of the recycled ribbon spools here in this picture as well as another "Candy Creek Kiss".
This is what the inside of our fireplace looks like this year. Of course I had to add the snowflakes to the tree as well the other décor. Those were found at Dollar Tree as well and I had most of them from last years decorations. The silver candle sticks were the ones that I found in Monroe, GA when I went junkin' with my oldest brother.
Here is a better shot of the fireplace. Please remember that the decorations aren't complete yet. I still have the stockings to make and finish the gumball topiaries. The gumball topiary is why I had to buy more buckets of air dry clay. It is taking me forever to make those and looking back now I wish that I had used small Styrofoam balls to make them with but it's a little to late now. I am half way done with the first one and it is already quite heavy. I didn't think about the weight before I started rolling out balls. Oh well what is done sure does look pretty so far.
Here are some giant lollipops that will go outside in the trunk.
I also have a few things out in the living room that aren't candy related but when I look at them I can't help but to smile so I added those in. If you would like to read about where the name Candy Creek originated from you can do so by clicking here
Here is how the candy theme came to be. These pictures were taken while I was in Oklahoma and Suzie and I ran into Hobby Lobby as they were putting out the Christmas decorations...in July!
YUMMMMY!!
I'm not sure if it was the sugar rush or idea of a candy theme this year that caused me to have such an odd look on my face in this picture. Either way......I have felt like a candy factory worker for the past month or so and my ears are starting to get a little pointy as well. I have to admit, I'm running out of steam before I am running out of ideas. If only I could twitch my nose or sprinkle some fairy dust to get more things done. I asked Beatrice for some help but she informed me that her job is to sit and guard the Christmas tree this year and that she was just too pretty to do any manual labor. If you don't believe me here I'll show you a picture of her and where she is right now.
See I told you! The Christmas tree is just to her left. Oh I guess that I should of told you that Beatrice is an elf....and apparently a Diva elf on the Shelf! I've been arguing with her for weeks now about how she needed to help out more around here and she just sits there looking all pretty and grinning at me. Well I best go because she has just informed me that I have been on break for entirely too long and that I will never get all the candy made if I'm just sitting around talking about it. Thanks everyone for stopping by and will be sure to post more pictures as I keep churning out candy.
Subscribe to:
Posts (Atom)


