Monday, November 10, 2014

Handmade journal with fold over closure tutorial

 Hi everyone! I made this journal on a whim and sort of forgot that I was going to do a full tutorial with it but I believe that I took enough pictures that you will be able to follow along rather easy. What I don't have pictures of, I will do my very best to explain in detail what to do. But this is a super simple little journal if you would like to make one for yourself. Also if you have ever covered chipboard or have been following me for a while and saw in my previous picture tutorials then you will have no problem whatsoever to make one. As you can see, I left the front cover plain and that was intentional. It's hard to write in something if you can't lay it flat.
 Your supplies are as follows (1) piece of regular weight chipboard cut at 5 3/8" x 8 1/2" this will be your front cover. (1) piece of regular weight chipboard cut at 8 1/2" x 3/4" this is your spine. (1) piece of light weight chipboard, something similar to a cereal box and by all means feel free to recycle one, 8 1/2" x 8 1/2" this is your back cover that will wrap around and make your front closure.
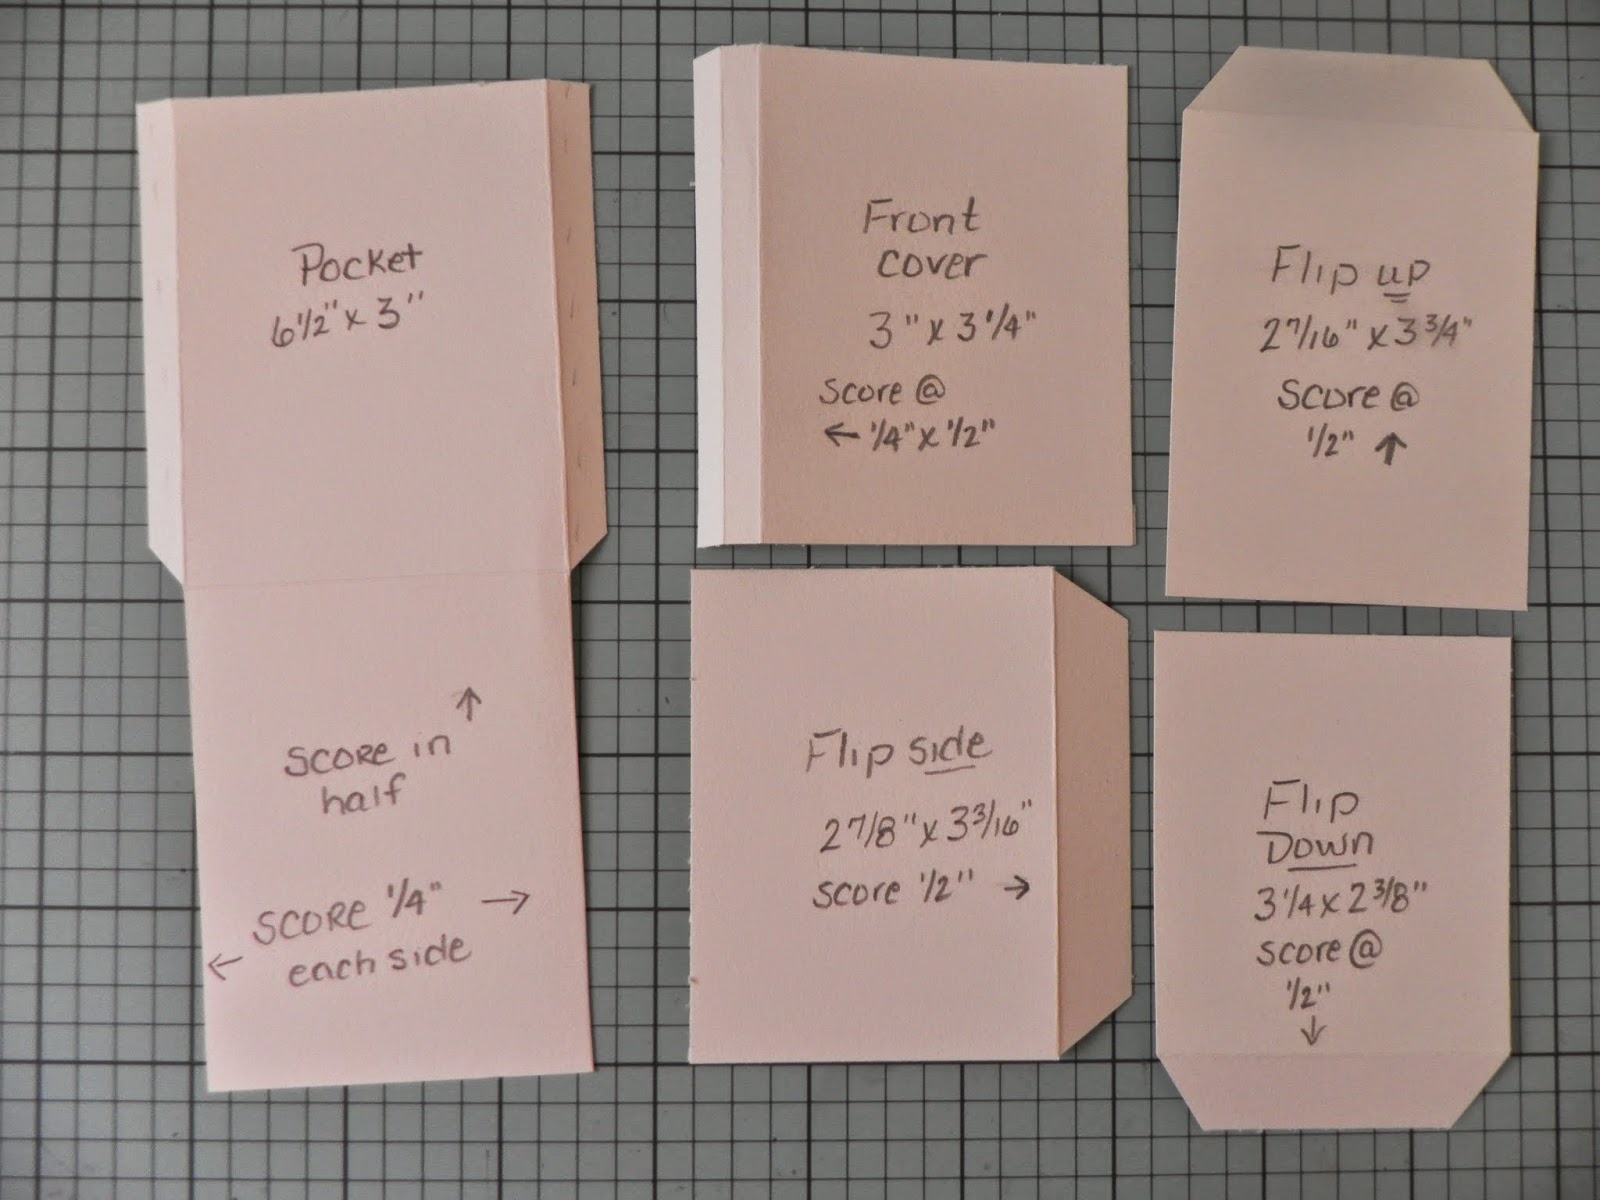
 I did some close ups for easy reference.
 PLEASE NOTE: I didn't get a picture of this but it's important that you do this at this stage. After you have cut your back cover. Put your chipboard in your trimmer and with a VERY worn out OLD blade start scoring the chipboard so that it doesn't cut all the way thru but more or less just scores it enough so that it will eventually give you a nice bend. Starting at 5 3/8" (score) every 1/8" until you reach the 6 1/8" mark. Remember be sure to lightly score making sure not to go all the way thru. You may even be able to do this using your scoreboard if you press hard enough. But I've done this method before on other projects and know that they work and hold up especially after you put your decorative card stock to cover your journal.
 In this journal I made 7 signatures. However, it may work better with only 6 or maybe I just hand sewed my signatures in to tight. I'm ok with my pages not being perfect but if I make another one I think that I'll only put in 6. Each signature is 7 pieces of plain computer paper folded in half. Once they are all folded and put together in signatures even up the edges so that they will be even in your trimmer.
 This is a step that I wish that I had skipped for this particular project because I actually wanted my spine to look worn and rugged looking. So if you are looking for the shabby look skip this step. If not, continue on reading. I used a piece of 2" x 10" tyvek (or you can recycle a postal envelope) to cover your spine.
 I wish that I had double checked these pictures at this point but what I was trying to show was how I had scored the back cover for you to see what it would look like and unfortunately I hadn't zoomed in enough. But you can see in the above picture and below picture how that section has started to curve naturally.
 The next step is the fun part......finding some pretty card stock and covering it. The paper sizes that you will need are as follows. (1) 6 3/8" x 9 1/2" front cover. (1) using coordinating solid card stock for back cover first 9 1/2" x 9 1/2". (1) using the pretty card stock for back cover, 8 1/4" x 8 1/4" this will go on top of the solid card stock in the back. (1) 3" x 9 1/2" solid card stock to cover the spine area once the other two covers have been completed.
 For the inside "lining", I used a piece of solid card stock and it is as follows. (1) 11" x 8 1/4". Note this will NOT make it all the over the "scored bend" it will stop just short of that area because you will want to use a marker and color that in with something that will match the papers you have decided to use. So go ahead and do that at this point. Then for the front inside flap, using the pretty card stock 2 1/8" x 8 1/4". Please see the pictures below for reference and I will tell you the paper sizes for the pockets under those pictures below.
 I used embroidery floss to hand sew my pages in and made 2 holes and added eyelets in my spine. Just line your pages up and make it as even as possible.
 The above picture is showing the front of the front cover and the inside of the front closure. I used a white hairband and a pearl brad as my closure hardware.
 The above picture is showing the back pocket and the inside of the front flap. The paper you will need for the pocket is 2 1/8" x 8 1/4". Then I used my round punch only inserting it half way to make the little pull area.
 The above picture is showing the front inside pocket and the first page of the first signature. The paper sizes for this pocket is made up from two different pieces of paper that I layered on top of one another. The sizes for this are (1) 2 1/8" x 8 1/4" and (1) 1" x 8 1/4". You will also need to punch a circle out of your solid card stock to cover your brad backing from the front cover if that is the method you chose. You can see in this picture where I have glued down my circle to cover the brad back. This will help keeping things from getting snagged it.
 On every page of the journal I alternated stamping using 3 stamps but feel free to do whatever you would like to do. Or not do anything at all. I did snap a few shots of two of the stamps that I used. I had found these at Micheal's in the dollar bin.
I do hope that I described this in detail enough for you and hope that you have fun making one. If you stumble across something that I didn't describe enough for you or if you have questions please feel free to leave me a comment and ask away. I will do everything that I can to help you.
Have fun everyone and have a Happy Scrappy Day!

Sunday, October 26, 2014

Thinking of you cards...

 Hi everyone! Here are a couple of simple yet elegant cards that I made for a couple of friends that are in the hospital and nursing home. I thought that maybe if they received a handmade card it might lift their spirits.
I used the DCWV Mariposa paper which is one of my favorite collections because it has so many butterflies in it and you all know that I love butterflies. then I also used some of the Stampin' Up cherry cobbler ribbon that I got on clearance for less that $2 a roll. I might add that their ribbon is really a good quality ribbon and you get a lot more on their rolls than what you normally do when you purchase it from a craft or hobby store. So keep an eye out on Stampin' Up's site for when they run it on clearance and be sure to stock up. I was able to get some of the cherry cobbler and a pink one as well.
I hope that you all have a wonderful day and thank you for stopping by.

Saturday, October 25, 2014

Sweet and Sour Kielbasa

I've been sick for so long and am craving some more good home cooking. I made this back in August and it has become a staple meal for us. I haven't made it since Aug but thought that I would share the recipe with you. You will notice in the picture that I used two different kinds of pasta because I was running short of the rotini noodles. It didn't make any difference in the taste of the dish so feel free to substitute. It's so good and such a nice hearty meal.

1 pack of Kielbasa sausage
2 tbsp olive oil
1 onion (chopped)
1 bell pepper (chopped)
1/4 cup brown sugar
1 box Rotini noodles
1/4 cup of crushed pineapples (drained)
3 tbsp soy sauce
1 tsp salt
1 tsp pepper
1 tsp butter
Directions
Place olive oil in a LARGE skillet on medium high heat. In a separate pot place pasta with water and boil for 7-8 minutes. Slice kielbasa and place in skillet with olive oil. Add onion and bell pepper with the kielbasa until the kielbasa starts browning up. Then add brown sugar and crushed pineapples and stir. Once mixture comes to a boil reduce heat and simmer for 8-10 minutes. Drain pasta and add salt, pepper and butter and gently blend. Place pasta on plate and top with kielbasa mixture. Enjoy!
4 servings
**Please note that I found this recipe a while ago on a website called At home with Nikki

Friday, October 24, 2014

Thank you cards using Gorjuss Girls stamps...

 Hi everyone! I thought that I would share with you some thank you cards that I made. I've been sick with bronchitis for over a month now and have had a few fairly good days but only about a handful of days where I've felt like doing anything other than laying in bed coloring images. But on the days that I did feel fairly good I made sure that one of the things that I did was make thank you cards for those who have cooked and made food to bring to me. It was more of a blessing than these ladies will ever know. The first one is the one that I made for my sister in law who brought me supper two times! Ohhh and it wasn't just anything it was my all time favorite comfort food. Soup beans, cornbread, fried potatoes and one of those meals even had some good ole fresh greens! YUMMY! Thank you so much Cathy, it was so good and my mouth is watering right now just thinking about them.
This second thank you card went to a neighbor to the right of me. Mary Jane brought me some homemade broccoli cheddar soup and cornbread. It was really good as well. Having some good homemade food tasted so good considering the fact that I haven't felt like cooking. I just don't have that kind of energy. It took me much longer than you think to get all of those mini albums completed and I would have to stop and lay down numerous times. My energy level is horrible right now and I just pray that it gets better soon.
Thank you again ladies for the meals. They were greatly appreciated.
Thanks to everyone else for stopping by and I hope that you are having a good day.

Thursday, October 23, 2014

Breast Cancer Survivor mini album project using Gorjuss Girl image...

 Hi everyone and welcome back. This is the last of the Breast Cancer projects that I've made. This is the idea that I was telling you that I had originally. I knew that I wanted either pink and white stripe or pink and white polka dot paper along with the chalkboard paper. I had planned on writing on the chalkboard paper but realized that my white marker was just about dried up and my faber castell markers kept wanting to smear so this was what I wound up doing.
 Of course I wanted to put one of the pretty Gorguss Girl stamped girl images on the front cover that I had colored up and then I used some glitter paper that I ran thru my Big Shot to add on top of the chalkboard oval and between the two I think that it showcased the pink ribbon nicely. The girl image is just the icing on the cake I think....have I mentioned how much I'm enjoying coloring with these new Spectum Noir markers lately?
 The pages for this mini album pull out in an accordion type style. Again, I was using whatever papers that I could find that had pink on them.
 I did add some punched pink ribbons to the pages but left them plain so that it wouldn't be intimidating for whomever receives it and so that the pictures are the focal point.
Thank you all for stopping by and I hope that each and every one of you are having a wonderful day. May I also ask that if you're able please do something to help support these ladies who have been stricken with this horrible cancer. We need to stick together and do what we can to help them and show our support in their recovery and to raise money for more research. If you can participate in one of the walks please consider doing so. Have a wonderful day everyone.

Wednesday, October 22, 2014

Fight like a Girl mini albums for Breast Cancer Survivors project..

 Hi everyone! This is something else that I made for Breast Cancer survivors. I couldn't find a paper pack that was specific for Breast Cancer so I made my own pink ribbon and pulled all of the loose pink papers that I thought would be pretty together that I have. I didn't realize how low I was getting on pink paper until I went to make these two little folio albums. Apparently, I've been making loads of projects using pink lately. But even though I didn't have a specific paper pad or collection, I still think that these turned out really pretty.
 I layered up several of the punched out pink ribbons and glued them together then ran them thru my Big Shot with and embossing folder so the ribbon would have some texture to it. and covered the spines with two layers of solid pink and white cardstock that I used a doily edge punch on.
 Then I added some little pink tiles that I had found at Tuesday Morning for $1.49 for a little bit of bling. And again I've used that cotton ribbon that I picked up at the thrift store. I tied knots at the bottom of each tail of the ribbons.
 As you can see the inside isn't all pink. I used the pink papers that I had and pulled other colors that looked pleasing to my eye and would go nicely together. They are all from different brands but seem to work.
 I did however go to Hobby Lobby and buy the pink stripe paper because I originally had another idea that you will see in tomorrows post. In the inside of the binding I added a punched pink ribbon as a little embellishment.
 As you could see in the above pictures, I didn't put embellishments on the pages. I did that on purpose so that it wouldn't be intimidating for the recipieant and the pictures could be the focal point.
This is what the backs of the mini's looks like.
I hope that you all are enjoying the projects that I made for these survivors. Come on back tomorrow for another project share. I hope that you're having a good day and thanks so much for stopping by.

Tuesday, October 21, 2014

Breast Cancer Awareness Earring project....

 Hi everyone! Here are some earrings that I made for breast cancer survivors. Not only these but numerous items will be distributed around the United States to those who are suffering with the awful disease. I hope that the ladies who receive these really like them and makes them smile.


Thank you all so much for stopping by...we have 2 more days of projects that I will be sharing with you. I hope that you are all having a wonderful day.

Monday, October 20, 2014

Breast Cancer Awareness Month and projects...


 Hi everyone! For the next 3 days, I will be showing you projects that I've made for Breast Cancer victims and survivors. Myself along with numerous other ladies in my crafting group are making things to give to these ladies....these fighters! I am so honored to be a part of this wonderful group of ladies that give without ever expecting anything in return other than the knowing that it might put a smile on someones face if only for just a little bit. The good Lord above blessed me with a crafty talent and I am a firm believer in sharing that and using it for good.
 So each of these little girls are stamped out and then I colored them up using my new alcohol markers. I have been sick with bronchitis for a good month now and so sitting and coloring has been one thing that I have still been able to do while laid up.

 I used a sizzix flip it die to cut the cards out. The paper is by Crate paper. I had picked up a 6x6 paper pad at Tuesday Morning for only $1.99 and it just happened to have a couple of sheets in it with the little bows. I thought that was perfect.
 I hope that you enjoyed seeing the cards that I made and remember for the next 3 days. I will have posts with Breast Cancer projects.
Thanks for stopping by and I hope that you're having a good day.


Sunday, October 19, 2014

Steampunk Princess pennant

 Hi everyone! Here is a pennant that I made a while ago and just haven't felt up to adding it to my blog. The digi I found online and it was free. I used my alcohol markers to color her. After I placed the designer paper over the pennant I went around it and dry brushed some white paint to give it a more shabby chic look.
 I used Wild Orchid Crafts flowers on this project and after placing and gluing the flowers down, I used some snowtex to give the piece and even softer feel. I also added some bling in certain spots on the project.
 I used a vintage doily that I had picked up a couple of years ago in Oklahoma while I was out thrifting. I think that it made a nice backdrop along with the patterened paper for the colored digi. You can print this digi off to color for yourself at Craftypaws.us.com There are more
 I then added some cotton ribbon in each corner. I had found an entire ball of that ribbon at my local thrift store for only .15 and love the feel of it. The little butterfly is one that I made myself using clay.

This is the back view of the project. I just love these doilys and it's so hard to find pretty vintage ones so I was tickled to find the ones that I did. I'm hoping to find more here locally. I keep looking for them but so far no luck.
Thanks for stopping by and I hope that you're having a wonderful day!

Saturday, October 18, 2014

Firefighter Appreciation Cards....

 Hi everyone, This is actually the second set of cards that I made for Firefighter Appreciation. I'm sorry but the first ones that I made I sent off before taking pictures of them. These cards along with
 about 100 more will be sent out to fire departments all over the country just to thank those brave men
and women who put their lives on the line every time that they clock in to work. I love doing things like this for variety of different good causes but this one really held a special place in my heart considering the fact that my oldest brother is a fireman.
Thank you all for stopping by and I have some more things to share with you. I am going to try to put them on a schedule so that for a while you will be for sure getting a new post from me each day for a bit. Have a wonderful day everyone!

Thursday, September 18, 2014

Micro Mini Album/Interactive ATC

 I have been doing something a little different lately. ATC's (Artist Trading Cards) but I put my spin on them. Now micro mini albums aren't anything new for me. Matter of fact the very first handmade album that I made was a micro mini that came from me becoming bored with doing 12 x 12 layouts way back in 1999-2000. However, I haven't been making these little ATC's long. Matter of fact the one in the above picture is only my second one that I've ever made. The first one I had forgotten to take a picture of and was totally different from this one but was still interactive except it had a gate fold interactive back. I will walk you thru this one and have included a picture tutorial so you should be able to follow along and make one for yourself rather easily.
 The insides can be decorated in any manner that you wish and so for this one, I decided to add a pocket on the inside cover and placed a couple of little tags. Then on the opposite side I have a little hidden spot which is under the pig picture.
 I didn't add this in the tutorial down below because it's quite simple just using a small paper hinge and magnets.
 When you raise the entire pig page up (which in the tutorial I refer to this as simple "Flip Up"). I decided to use my file folder punch to make tiny little folders with pockets on not only just the "Flip Up" section but also the "Flip Side" section.
 Inside the little file folders I wrote several quotes that I love, but you could add anything you would like inside those little folders. Say for example, a grandmother might want to write their grand children's name on a folder with their birthday on the outside for ease of remembering and on the inside they might add things that they have heard that child say they love, or favorite color, clothes size etc.
 In the above picture you are looking at the inside of the "Flip Side" page with a simple butterfly print on it. And a bird print on the "Flip Down" page.
 Here you can see it all opened up. The only picture that I did forget to take was one of the backside that shows the little section to put your ATC information. I notched out the top on the back and added an eyelet and some ribbon so it would be easier to pull out. Now below you will find the picture tutorial.
 Cut and score your base as shown above. Please click twice on the pictures for an even larger view.
 Now go ahead and do your cutting. I placed each section back in the same spot to take the pictures so it would be easier for you to follow. Please note the little notch that I forgot to cut on the pocket. You will see this in the next picture with the adhesive.
 Place your double sided tape ONLY on the areas shown...please see the next picture because on the front cover it needs to go front and back as shown in the last picture.
 As far as putting it together. Start with your pocket page and your front cover. Before folding the pocket page and sealing shut. First be sure to use your hole punch and only going half way down in the punch snip a little piece out so that your pull will be easier seen. Then take the tape off of the backside ONLY of the front cover and adhere it to the left side of your pocket. Then go ahead and peel off the rest of your tape and seal your pocket up. Now you have a little booklet with a pocket in the back. Next step is super simple. Open your little "booklet" up and everything else will be happening on the right hand side by installing the flip up, flip side and flip down in there appropriate spots. If you will refer either back up to the pictures that I showed previously or look at the pictures below you will see with the pages decorated. I named the pages very generic just for this purpose.


 In this above picture you will see the inside front cover on your left and the inside of the flip up page, the front side of the flip side page.
 In the above picture you are looking at once again the inside of the front cover, part of the inside of the flip up page, the inside of the flip side page and the front side of the flip down page.
Now you will see all of the pages open. I couldn't get the entire thing in the picture, but you can still see part of the flip up page at the top of the page.
If you do happen to have any questions please let me know. For your pattern papers, just cut each one 1/8" smaller than the page fronts.
Thanks so much for stopping by and I hope that you enjoyed the tutorial and make one for yourself. If you haven't already subscribed to my blog please do so for in the upcoming months, I will be adding many more items to share with you.
See you soon!