Monday, March 26, 2012

It's that Time Again????.......

Hi everyone! Ok this is just to let everyone know that there more than likely want be any new posts on the blog for a bit due to me having to perform one of those lovely little chores called Spring Cleaning. I have already started by cleaning some drawers out and tossing things that I honestly am tired of cleaning. I'm learning that less is best! A perfect example is my walk in closet. We use that thing for more than just hanging our clothes...it's like a storage unit as well! So I'm tossing as much as I can possibly get rid of. I've decided that if I didn't wear it last season then I simply am NOT going to wear it and there is no need in it hanging or sitting in the closet taking up precious space. (where something pretty could be hanging that I WOULD wear ~GRIN~). I've also found that the best time to dig into my closets and drawers are either when I'm just fed up with picking up useless things around the house or right after I've watched an episode of Hoarders on tv! So as I'm cleaning today if you all hear someone continue yelling "LESS IS BEST" that would be me as I toss clothes over my shoulder that will land in a big pile on the floor and eventually no longer be part of my hoard. I figure this way once I get all the clutter out of my life then it will be much easier for me to roll up my sleeves and get down and dirty with the real cleaning. (I'm trying to make it sound worse than it probably really is for my own benefit here everyone just so you know). Ok so off I go to conquer this little thing we call Spring Cleaning....don't send out any AWOL's for me in my absence because now you know where I'll be.......dust bunnies put up your dukes...this chicky is coming to rid you of her life!

Wednesday, March 21, 2012

Where the name came from....

Hey everyone! Ever wonder where I came up with the name Candy Creek for my blog? I'm not sure that I've ever explained this or not. Well I'm sure that most of you all know that we live on the lake here in upper east TN but did you know that this very spot used to be where my in laws used to run a little boat dock? Well they did! Many years ago there used to be a candy factory up at the end of the creek and so that's where Candy Creek came from. Then this blog took on Candy Creek to represent the boat dock that used to be here. We just lost my father in law this month and while my husband and his siblings were going through some things at the farmhouse he ran across this sign. I had already told my husband that I wanted to make a pretty sign that said Welcome to Candy Creek for the entrance but was as shocked as he was I believe when he came home with the original sign from the old boat dock that used to be here. So Mr. Candy Creek immediately hung it prominently on the front of our house. I noticed him looking at it yesterday and almost felt I could read his mind. The grin on his face told me that he was thinking of older times and wonderful memories. He was just a little boy when the boat dock was up and running but can remember lots of things about his childhood.
So there is just a little history behind where I came up with the name for my blog. I hope that everyone has a great day today. I'm off to do some spring cleaning and enjoy looking out at all this beautiful sunshine!

Saturday, March 17, 2012

"File Tab" paper bag mini album tutorial....

 Hey everyone! Well a little over 6 hours later I'm FINALLY able to get this posted. It's not because I was doing sooooo many other things today either...it's because me and blogger just wasn't seeing eye to eye on this and was refusing to post my pictures and when it did they would be upside down or sideways or would just lock the computer up all together so back to square ONE I would have to go. So before I lose all the pictures again hopefully I can get everything typed on here and in detail so that for those of you that want to make one you can. This is my design, if there is another one online somewhere then I don't know about it and have never seen it before. However, the binding technique is one that I learned from Laura Dennison over at Following the Paper Trail and I feel sure that she can teach you all much better as to how put the rings in for your binder. I used K & Company's Urban Rhapsody for this project along with some acetate sheets (recycled)
For this mini album I used the larger lunch size bags that you can buy at Micheals.
 First off take and cut off 1/8" off the opened end of the bag to get rid of the little squigglies. Then measuring from the BOTTOM of the bag up, score at 5 1/2" and fold the top of the in the opposite direction AWAY from the factory bottom flap as shown in the picture below....
 Now open that side back up that you just scored and folded and follow along with the picture with these instructions. If you need to go ahead and blow the picture up so you can read what I've wrote better. Apply glue on flap side that you just scored and folded about 3/4" up and the width of the flap. This will be the bottom for your "shipping tag" later on and must be done at now.
 Once you have that done. Your ready to start covering your paper bag with pretty patterned paper. I used several different ones on my entire album as well as the sample I did so you could better see where things were placed. This is the dimensions you will need first. 6 3/4" x 4 1/2" and then score that at 2 3/4", this will give you the fold you will need to go around to the back or front. You will use the short side to cover the factory bottom flap of the bag which will later become a pocket.
 As you wrap your patterned paper around the bag be SURE to tuck your patterned paper into the bottom of the flap to hold it securely in place like the picture below.
 Now onto the next different patterned paper for the opposite side. Cut a 6 1/2" x 4 1/2" piece and score at 3".
 Just like before wrap your paper all the way around using your score as your guide and tuck the paper underneath the back flap. I have placed the scored paper under the paper bag in the pictures so you can get a better visual as to what I am talking about.
 The tags that you will need for the end where you had cut off 1/8" are 4 3/4" x 4 1/2" and you will need 2 of those.
 To make the lift up flap for the back of the "page" you will need another patterned paper that is 5 3/4" x 4 1/2" and then score that at the top at 1" and you can round your corners at the bottom like I have in the picture above.
 Before I tell you where to glue the lift up flap you can go ahead and place a bead of glue on either side of the factory bottom flap to make another pocket. If you look closely in the picture above you will see that I have wrote GLUE where it is suppose to go. And the tag for that pocket is 3 1/2" x 4".
 Now back to gluing in that lift up flap. Please look closely at the picture above to find your correct placement of the flap. It will be the very center seam of the bag. I have opened it up to show you as best I could while still taking the picture for you. You will place it as far to the left side as you can where my thumb and hand are opening the bag. Be sure to put glue on the front and back side of your flap ABOVE the score line so that it will seal the bag seam closed.
 Once you've done that the back side of your "page" will look like the picture above.
 And the above picture here is what it will look like when you raise the flap. The picture below is one I took of my completed front page so you will have a good reference and can see how things are placed.
 And the picture below here is what the back side of my page looks like in my mini album. One thing to note is. The end of your page that has the factory bottom flap is the end that you will also be putting your eyelets in to bind your album. At the end of this tutorial I will list how many bags I made to complete my album.

 This is what the "portfolio" page looks like opened up.
 One thing I would like to say is. You don't have to put your pages in your album all one way. I switched mine up and did a few the opposite way as you can see in the picture below. Its your album, you can do it whoever you want to.
 Now for the count of how many pages I used. I used 4 paper bag pages, 3 "portfolio" pages and 3 acetate pages that measure 5 1/2" x 4 3/4". You can look at the last picture on this post for that. IF you can see the acetate.
 Now for the cover. First off, please go to Following the Paper Trail and watch Laura show you how to make the binding that I used in this album. Even though the pages themselves are what I've come up with, like I said at the beginning the binding part I learned from her. But I did however try my best to draw out the measurements and posted the picture above for you. But NOTE**** this ONLY works for the larger Tim Holtz D rings. If you decide to use O rings you will need to refigure and Laura teaches how to do that perfectly. As a matter of fact I believe that Elsa over at Just a Few Designs even shows how to do this same binding technique.
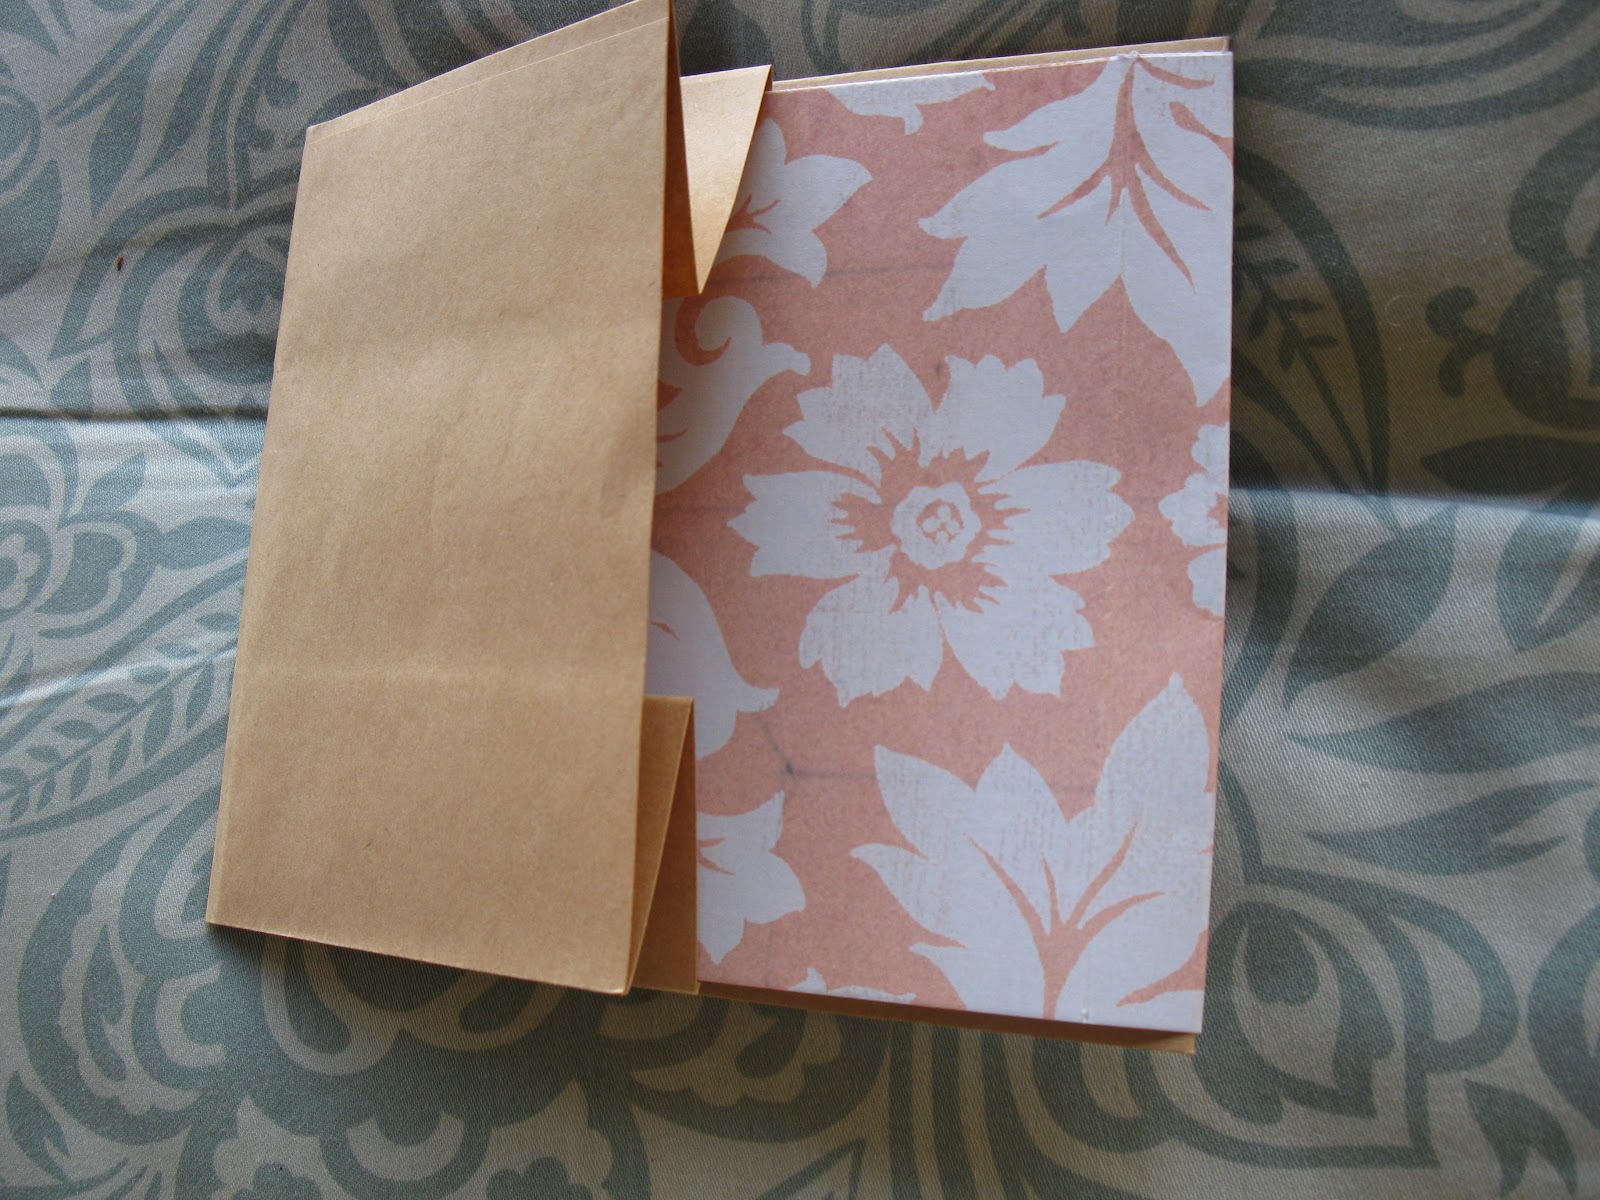
So now what you will need as far as chipboard and pattern paper for your cover. It is as follows:
Chipboard
(2) 5 " x 5 3/4"
(1) 2 " x 5"
Pattern paper for the OUTSIDE cover
(2) 7 1/2" x 6" butting the paper together at the center where the 2" spine is
Pattern paper for the INSIDE lining
(2) 6 3/4" x 4 3/4" and again butting those papers up in the middle at the spine
For the Inside pockets in the front and back covers
(2) 4" x 5" pieces of pattern paper
 the tags for those pockets need to be 4 1/8" x 4 3/4"
Here is the acetate sheet that I did and added matching butterflies to the front and back of the page. It's really hard to see but it's there..trust me.
Now really all that you have to do is add the file folder tabs in the locations like you see in my completed album and embellish it and add pictures and your good to go.
I did make the flowers on the front cover but I'm sure that everyone has seen how those are made before numerous times so I want bore you with that.
I hope that I haven't forgotten anything majorly important for this tutorial. I was at my wits end just trying to get it on here for you all. If I see that I've missed a step or if one of you all see that I have then please by all means let me know so that I can change it or add more information.
Thanks and Happy Scrapping!

Happy St. Patty's Day Everyone!

I hope that everyone has a wonderful St. Patricks Day today. Here in upper east Tennessee the weather is gorgeous. Spring has arrived and I'm happy for it and loving the warm weather that we are having here. I'm just hoping and praying that it sticks around and doesn't turn off cold again.
I made a mini album about a month ago and forgot to take pictures so I could do a tutorial for it while I was working on it so this morning I have gone back and done that and will be posting that next so come on back and check it out. Have a great GREEN day today. Psssst you all did remember to wear your green today didn't you???

Monday, March 12, 2012

New Toppers!

Hey everyone! With this nice spring weather here it's really gotten me in the mood to get some things done that I've been putting off forever. Well that and the fact that I've been feeling so much better the last 2 months. I had bought one extra curtain panel last year when I redid the living room and knew that I could make a topper for both door with just one panel. Well a year later I'm getting that done and here they are. One curtain panel and some chocolate colored ribbon and I'm done with that project and can mark it off my endless TO DO list. Mr. Candy Creek liked them as well. He said that they looked great.....he paused while admiring them and said "they are girly but look great".  Men!...that's all I could think....Men! I realize I'm outnumbered here 2 to 1 but gosh I really was trying to make the living room more "guy friendly" aka "manly"! I suppose had I used a camo printed fabric and maybe some jute rope instead of ribbon that wouldn't of been "girly" at all then right? I'm just thankful that my husband noticed them. My son walked right by them and never even noticed they were there. So I'm not going to get to upset that Mr. Candy Creek noticed but referred to them as girly. Would I be pushing it to far as to say that maybe they are a bit sophisticated?
Ya'll have a great night. I'd like to turn in early tonight because my body just isn't getting the hang of this new time yet.

Friday, March 9, 2012

A great giveaway at Notes from a Cottage Industry!

Hey everyone! Please hurry and go to Tracey's blog and sign up for her fabulous giveaway. I know that you all will be thrilled to see what she's offering. I know that I am. I so need 2 of those things that she's giving us for FREE! So good luck to you all and here is the link for you to click.
http://www.acottageindustry.com/a_cottage_industry/2012/03/march-give-away.html

Something new I've been taking classes in....

 If you've been following me for a while now then you all know that I've been wanting to learn to paint for a long time now. So I started taking classes here locally. And these 4 paintings is what I've done so far. I really enjoy it, it's been loads of fun and very relaxing for me. So for the month of January this is what I was doing...January and part of Feb of this year.
 Lighthouse with waves crashing moss covered rocks
 Snowball egret
Pot of flowers.
I pretty much had to stop there with these because we had 3 deaths in 2 1/2 weeks that started on Valentine's Day. So it's been pretty stressful around her but things are slowly starting to get back into a routine again and I'll get back to practicing my painting again and will be taking more classes but right now I have to focus on the projects that have been staring at me entirely to long. So those will get done first before I go out and buy ANYTHING else for more projects. I do know that I have some big projects coming up. Like my son's bedroom and would love to get our guest room/craft room painted this year. And yes ladies it's just about time for some serious spring cleaning. So I have loads of things lined up to get done. I promise that I'll do my best to try to take before and after pictures for you and then sit down and share them with you all. So just keep dropping back by.

Don't throw away those glass sauce jars!!

 Do you use a specific brand of spaghetti sauce? If so, don't throw those glass jars away! USE THEM! I happen to use Bertolli sauces (and add to the sauce to spice it up a little more) but I've been saving my jars ever since I saw a post on pinterest where a lady did this very same thing. It's super easy to do as well as you can see. You just remove the labeling and then I painted my lids black and added some ribbon and a little embellishment.
I needed a better way to store my ribbons that I use for scrapbooking so that I could get to them faster. But you don't have to just put ribbons in them......if your a crafter think about buttons, beads, metal embellishments, paper flowers ect ect. and these wouldn't be just good for crafters...if you have limited room on your kitchen counter...think of making these jars for to store your flour, meal, sugar, coffee, tea. OR popcorn, rice, beans. The uses are endless but the best part of all is that this project is pretty much free! Hope you get inspired to start saving your jars as well to give them new life and you'll have a trash to treasure of your own!

Wedding Album with a touch of Country...

 Hi Everyone! First off should I say Happy New Year to you all?? WOW! I'm so sorry...here it is March and this is my first post for this year. It's not like I haven't been doing things. I've just neglected you all by sharing with you. So I'll be doing some makeup posts over the next few days.
 I actually made 3 of these albums using Laura Dennison's pattern from Following the Paper Trail. I didn't do them all alike but have already given the other 2 away and forgot to take pictures of those.
 This is how I decided to do my little flowers on the binding of the book. It's a little different from how Laura did hers. Please scroll on down to see the rest of the album.


After making 3 of these at one time. I'm not sure that I'll ever want to make another one because they were so time consuming. But once they were complete I can see how all that time was well worth it.
I have another post that I'll go ahead and post tonight and will look at what else I've forgotten to share with everyone. Have a WONDERFUL night everyone and come on back soon to see what else I've been doing.