Wednesday, September 28, 2011

Sneek Peek at what I'm working on now....

 Hey everyone! This isn't anywhere near done but I thought I'd show you what I've been working on. The cover isn't even embellished yet it's still naked and plain but I have big plans for it. I can't really call this a mini album even though it's short like one as you'll see it's quite fat already and I'm not nearly done with it. So I'm gonna call it "Fun sized". I'm making this album for my best friend Suzie from over at The Happy Shack and filling it with pictures of our "adventures together since 2008. Needless to say I needed something with loads of room and this is the ticket. I decided that I was going to combine some of my favorite scrapbook artist pages in this one album as a dedication to them and will listing the youtube links for each of them with the pages I did in this album. These ladies are extremely talented and I love their work and they deserve all the praise for inspiring me. So here goes....my outside covers measure 5 1/2" x 6" and the binding technique is one that I saw Laura at Following the Paper Trail use. That is the one thing I don't have a link for right now but when I post the completed album I'll be sure to include that for you.
 The above picture shows how thick this album is and it's no where near complete but I'm having so much fun with it. The thickness is almost 4 1/2"!! I'm loving it so far!
 Ok so in this picture I want to SPOTLIGHT the first scrapbooking artist which is.....Elsa at Just a Few Designs. She came up with the side pocket album and so I've used her page in this album. She's the sweetest thing ever and I've been watching her work ever since she posted her very first youtube video. Here is the video link for this page if you would like to make it as well..

http://www.youtube.com/watch?v=bzGjRq3MYV4&feature=related
 Next up....This one you all have heard me mention many many times throughout my blog. It's none other than the ever popular and much loved Laura at Following the Paper Trail. I included her pocket page. I did an entire album like this previously and shared it with you but the dimensions fit so well that I used it again. Here is the link for instruction to make this page..it's called the Pouch Page..

http://www.youtube.com/watch?v=bzGjRq3MYV4&feature=related
 This next one was a Laura idea and you've seen me do this one many times although this time I had to adjust and tweak it so that it would fit. It's the Z-fold and here is how I changed my measurements to make it fit. Cut a 9"x6" envelope down to where it's 8"x6" making sure to cut a sliver off one end to form the pocket. Then I made a score line at 3" from the bottom just like the following video will show. The back part on mine is all different from what Laura did. I didn't use the coin pocket envelopes at all as you will see in the next 5 pictures...instead I created a fold out flap and then in another I created the flap with a pocket as well..this will accommodate even more pictures to give me the most bang for the buck so to speak. And I also used fold out "tags" that accommodate 6 pictures as well. So this one page really gives me ton of real estate. Here is the original link for the video..
http://www.youtube.com/user/FollowThePaperTrail#p/u/84/ED-A8k4YUmc

 in total I can get 8 pictures on that one fold out flap rather than using the coin envelopes and its and alternative for those of you who can't find the coin envelopes or are overseas and those are ready available to you.
 This is the one that folds out and reveals a pocket for a tag.
 keep flipping...
 Ta Da! and there it is!
Ok so the last scrapbook artist that I have "featured" in this album goes to Ms. Bona from Live Love Scrap. I'm sure that if any of you have ever watched youtube you have all heard of her. She's yet another extremely talented lady with a ton of ideas. This is just one of her ideas. I had done this before and then when I went to tell who inspired me to make one myself I had not only forgotten who it was but had lost the link as well. She calls this her Picture Fold Up Wallet...she used it as something you could stick in your wallet but I've glued the back in my album and this little puppy can hold up to 17 pictures!!! What more can you ask for? So here is the link for her video as to how to make it...
http://www.youtube.com/user/FollowThePaperTrail#p/u/84/ED-A8k4YUmc

Thank each and every one of you ladies for inspiring me each and every day! And thank you Suzie for making me laugh and giggle just looking at these pictures while I'm making your album. It's almost as fun as if you were right here with me while I'm making it........ALMOST!
I'll be sure to post the final pictures of the album once it's completed...or at least show you a few more finished pages and what I've come up with for the front cover. I'm excited for you all to see the idea I came up with for it.
Here is what the front cover looks like now that it's done. Yes I love butterflies just like Elsa does so that was added for both of us. I hope that I served them proud and that they enjoy my album if they ever get to see it.

My Mexican Casserole recipe....

Hey All! Yesterday I was on the phone with my mom and was working on a mini album while talking and she was telling me about a Mexican pie recipe that she had made and how good it was. Well I have to be honest...I'm an not real good at multi tasking at all so when she was telling me what she put in it all that heard was Mexican pie, ground beef and what I thought was corn chips. Well I had stopped working on my album to finish our conversation because obviously I didn't hear the rest of the ingredients because I just simply can't do 2 things at once. So after our phone call ended I got to thinking about what I was going to make for dinner and so the mad scientist headed to the kitchen to see what I could find to make. So I grabbed the corn chips, ground beef and then opened my pantry and literally started pulling anything out that sounded like it would be good in a casserole and here is what I came up with....by the way. I misunderstood my mom about the corn chips as well...she had said corn tortillas. But this turned out really good and my husband loved it as well.
ROBIN'S MEXICAN CASSEROLE
*
(1) 10.5 oz bag BBQ corn chips
(2) pkg taco seasoning
2 lb ground beef
(1) 16 oz refried beans
(1) 15 oz whole kernel corn (drained)
(1) 15 oz diced tomatoes (Italian style)
(1) small can sliced black olives (drained)
(1) Tbls dried chopped chives
(1) tsp onion salt
         OR
(1) medium onion chopped
(1) 8 oz (2cups) Sargento 6 cheese Italian
(1) cup shredded cheddar cheese
salsa
sour cream
*
Brown ground beef and drain. Add taco seasoning as recommended on pkg. In a large sauce pot combine beans, corn, tomatoes, olives, chives and onion salt. (Drop the onion salt if using chopped onion, saute chopped onion while browning ground beef if you choose that route). Heat this mixture then add ground beef to bean mixture and stir well. In a greased 9 x 13 glass dish add a layer of corn chips then a layer of the bean/beef mixture then add some of both the cheeses and repeat this step one more time. Crumble the remaining corn chips and top off casserole.
In a preheated 350 degree oven bake for 20 minutes.
Serve with salsa and sour cream.
ENJOY!

Tuesday, September 27, 2011

Chili's copycat Grilled Carribean Salad....

Hey all...I thought I'd share a copycat recipe that I made from a recipe book that my best friend Suzie had bought me. It was so good that I had to share it with all of you.
*
CHICKEN
4 boneless, skinless chicken breasts
1/2 cup store-bought teriyaki marinade
*
HONEY-LIME DRESSING
1/4 cup Grey Poupon Dijon mustard
1/4 cup honey
1 1/2 tablespoons sugar
1teaspoon Asian sesame oil
1 1/2 tablespoons apple cider vinegar
11/2 teaspoons lime juice
*
PICO DE GALLO
2 medium tomatoes, diced
1/2 cup diced onion
2 teaspoons diced jalapeno pepper (I left this out)
2 teaspoons minced fresh cilantro (I used 1 teaspoon of dried)
pinch of salt
*
*
4 cups chopped iceberg lettuce
4 cups chopped green leaf lettuce
1 cup chopped red cabbage
1/2 cup fresh pineapple, cut into chunks ( I used a can of pineapple chunks that I drained real good)
1/2 cup mandarin orange slices (again I used canned that was drained)
1/2 cup whole dried cherries (I left these out because I don't like them)
2 cups crushed tortilla chips (husband didn't like them as a topping)
*
*
1. Do ahead: Marinate the chicken in the teriyaki marinade in a covered container for 2 hours in the refrigerator, turning occasionally.
2. Do ahead: In a small bowl, combine the honey-lime dressing ingredients whisking well, and refrigerate in a covered container.
3. Do ahead: Combine the pico de gallo ingredients and refrigerate in a covered container. (I made a double batch of the above dressing and put it in a rubbermaid dispensing bottle)
4. Light a charcoal grill or preheat the broiler
5. Remove the chicken from the marinade and shake off the excess. Cook each breast, turning once 5 or 6 minutes per side, until cooked through and no longer pink in the middle. Set aside and keep warm.
6. Combine the lettuces with the cabbage and divide among 4 serving bowls. Top each salad with the pico de gallo, pineapple chunks, orange slices, cherries and crushed tortilla chips.
7. Slice the cooked chicken into thin strips and divide among the salads. Serve with ramekins or honey-lime dressing on the side.
*
Serves 4 and the estimated AT-HOME cost is $9.50

Wednesday, September 7, 2011

Handmade Smash Journal tutorial.....


Hey all! Welcome back...well it took me a while but I promised that I'd do a tutorial on the smash journal that I showed you all a picture of that I made last month. I made one for myself this time and took the pictures as I was working on it....I'll note what products I used to finish it up at the end of this post. READ ALL INSTRUCTIONS FIRST BEFORE BEGINNING and look for CAPS on really important things. So lets get started...

What you will need for the front and back covers are as follows: (2) 7 3/4" x 10 1/4" chipboard, (1) 14 1/8" x 10 1/4" flexible chipboard (this is extremely flimsy and has to be easily bendable), (1) 3" x 10 1/4" chipboard (this piece will be cut again to use as a reinforcement piece for you latch) ***NOTE the picture above shows the measurements written on each one and you can go by those HOWEVER...the measurement showing what the center measurement is is WRONG....it should of said 5 1/8" rather than 5 1/16". You can see how I cut the triangle section out and all the measurements you'll need.

IMPORTANT** Work from the back inside cover FIRST! Once you have your triangle "reinforcement" piece cut out go ahead and glue that on your larger flexible piece of chipboard and then cut the excess off after the triangle piece is glued on. This way you have a perfect "fit".

After doing the previous step go ahead and grab one of the 7 3/4" x 10 1/4" chipboards and on one side make a tick mark measuring over 2 1/4" on the opposite side of that mark on the BACK side go ahead and apply your glue and glue that to the above piece as shown in the picture. The basics for the back of your journal is now complete the area in the picture that is showing as white will be the area that will bend over and allow for you to Velcro your stick glue and a pen plus it will have plenty of room for your journal to expand. NOTE* 14 1/8" is the longest that I could find for my flexible and bendable chipboard...if you don't want to Velcro a tube of stick glue and a pen on the inside of the journal then you want need to do the offset on that one end.

IMPORTANT** if your planning on using the magnetic closures like I have it is important that you cover the inside of the back cover FIRST so that you can place your closure and then cover it all up when you cover the back side. Just a few notes about covering with pretty cardstock....First off you will need 2 coordinating pieces of cardstock to cover all of it as shown above in the picture and be sure to allow enough room around the edges so you can fold it over to make nice clean edges. (I've shown how to cover cardstock before in previous posts). Secondly, the area where the flexible chipboard is.....I've found that it's best to use a liquid glue for this area such as Quick Dry. But be sure to smear it around nicely before applying your pretty cardstock. The reason I say that is...if you don't use a liquid glue then the "flap" will squeak each time the journal is opened and closed. I learned that lesson after making the first journal. And then Thirdly when your putting your cardstock on...use a bone folder to make crisp edges where the chipboard and flexible chipboard are 2 separate heights. Refer to the above picture and you can see where that was done. It just makes things crisper and cleaner looking as well as will prevent the cardstock from pulling away.
 Now once the inside of the back cover had been glued down and all edges have been cleaned up. BE SURE that you have already added your magnetic latch BEFORE covering the back side of your journal. As you can see...I covered this side in the same manner as I did the front side by using 2 different coordinating cardstocks. The only thing to remember now is that you want had to cut your cardstock wider this time. Now you will cut it to fit or better yet leave a little bit about 1/8" so that the other paper will peek out a little all the way around the journal. I think that gives it even more character....AGAIN use liquid glue of some type on the area that will be bending and don't forget to smear it so that you want have bumps showing through to your cardstock.
 Now that the back cover is all done...your ready for the front cover. Another reason why I start from the back is because if I started from the front then I wouldn't know exactly where I needed my other half of the magnetic clasp should be placed. So go ahead and cover the front, leaving some excess all the way around. Be sure to snip the triagled edges off all for corners but DON"T get too close to the chipboard. Then place your back piece directly under your front cover....fold the flexible "flap over toward the front cover and figure out where you need the front closure to be located. Go ahead and install that and then cover the inside of the front cover like you did the back side of the back cover.
 This is what this inside of both the front and back covers looks like. As you can see I added a couple diagonal pockets to mine.
cardstock is showing in the picture. You could let your imagination run wild here on these. The picture below shows another example of how I decorated my envelopes.
Ok well your pretty much done now. You'll need to cut SEVERAL and I mean SEVERAL pieces of cardstock or whatever kind of paper you plan on using inside your journal. The measurements for that is 7 1/2" x 10". I had probably 35-40 sheets in mine (and that's just a guess!)
*FOR BINDING IT: I used my Bind it all...but you could use a hole punch and book rings as well, or you could even use Ribbon if you didnt' want to use book rings.
*THE CARDSTOCK I USED WAS: DCWV Mariposa stack, K & Company Homemade Specialty Papers stack
*CARDSTOCK FOR THE INSIDE: A WIDE VARIETY (I actually just go through and try to use up the stacks that I don't have many papers left)
*MAGNETIC CLASP: came from Hobby Lobby and comes in a package of 3 and are called My Purse Hardware and were $2.99 when I bought them about a year ago
*ZUTTER ROUND IT ALL CORNER ROUNDER FOR THE EDGE CORNERS OF YOUR INSIDE PAGES 1/2" it's the pink one
*ATG GUN
*QUICK DRY GLUE
*BONE FOLDER
*SCISSORS
*TRIMMER
*VELCRO: for you to add your glue and pen inside. Please see the previous post on the other SMASH journal that I made that shows where they go. I am out of glue sticks right now so mine aren't in there yet.
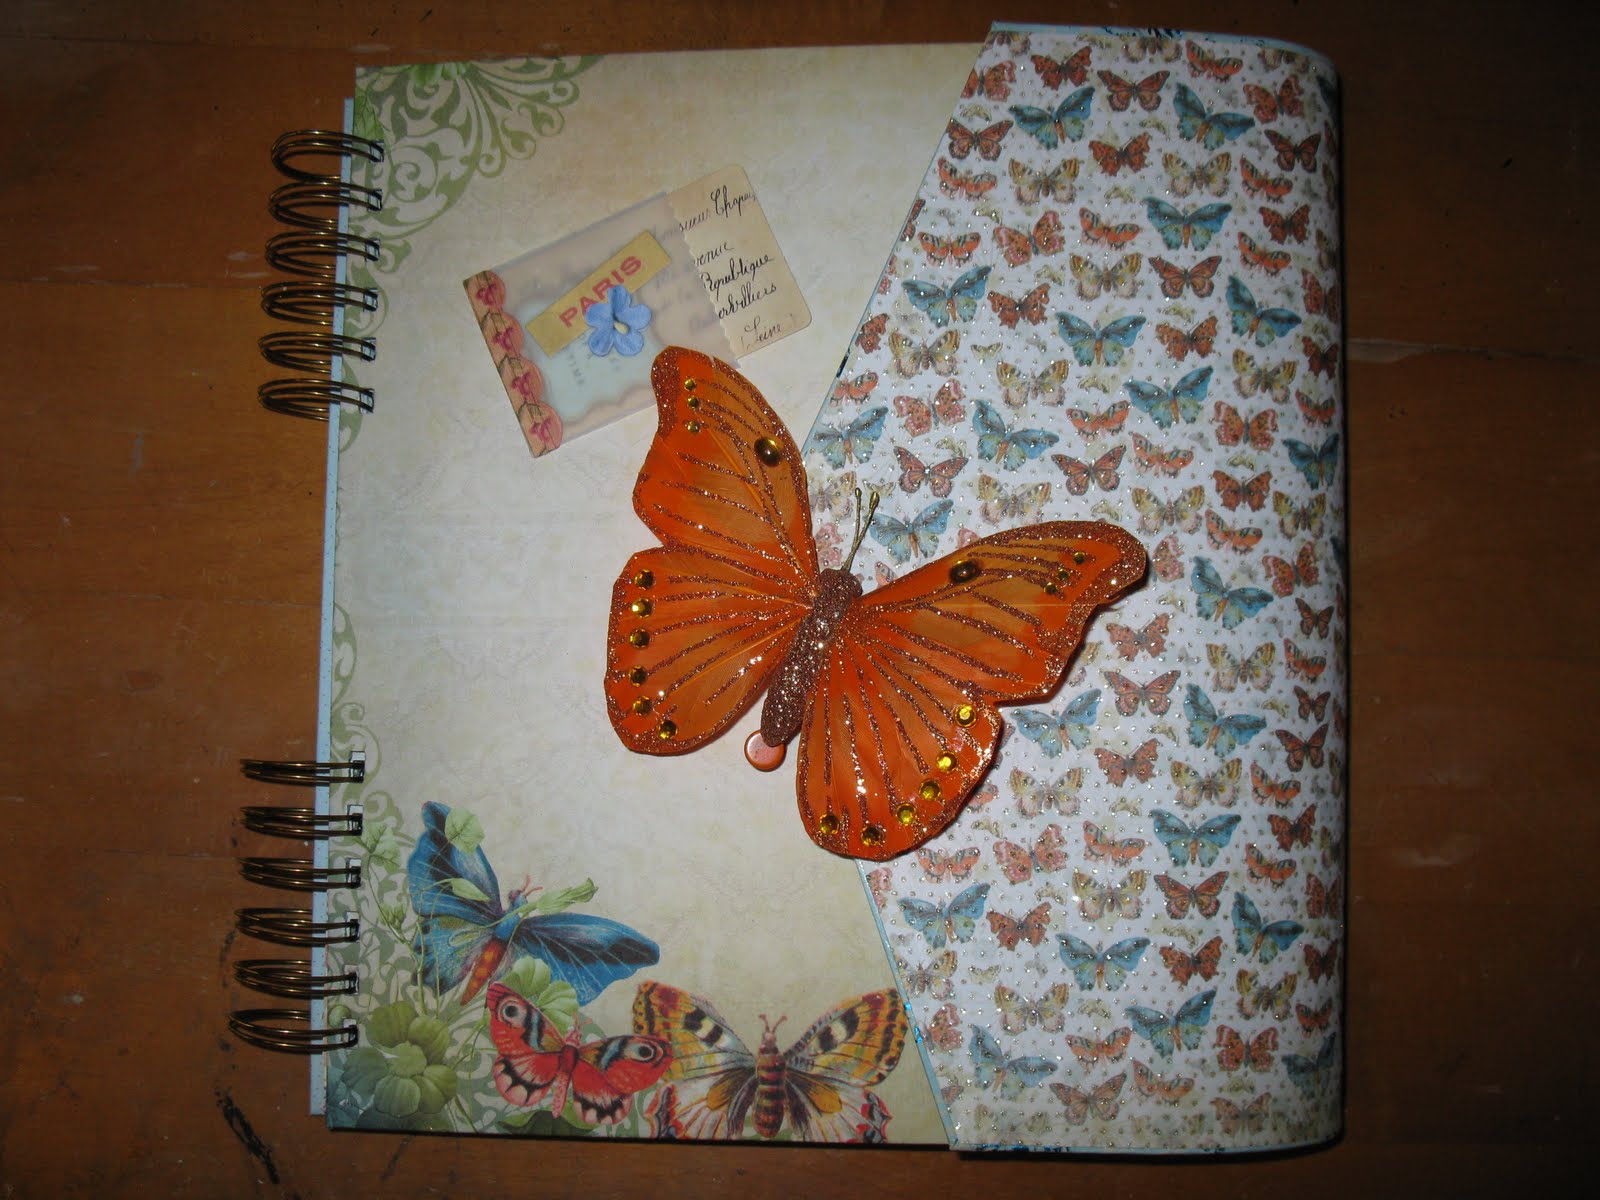
*EMBELLISHMENT: The butterfly I found at Michael's in the bargain bin for $1 and it simply clips on. (wish that I had more of those..I bought the last one they had at the time)
I've tried my best to be as descriptive as I possibly can and hope and pray that I haven't forgotten anything. I think that if you look at the pictures as you read it will make more sense to you. But if you do have a question just let me know and I'll try to help you the best way that I can. Hope that you enjoy and have as much fun making them as I do! I'm going to make mine an inspiration journal and look forward to getting started on it. Have FUN! and give me some feedback letting me know if you made one or not and if you like yours or if you have even more ideas to add to mine.
Come on back soon....I'm going to start on a mini album tomorrow and will try to post day to day pics of my progress on it...so check back often.
P.S. Just because I'm calling this a Smash journal doesn't mean that it has to be that....you could always make one of these and use it as photo album as well.

Saturday, September 3, 2011

Bling it and mean it!......

 Suzie and I firmly believe that if its not moving then it's fair game to BLING! and we mean that literally!
Here is the scissors that we blinged up on my visit this year to her house! They are so pretty! Now I just have to get back into my craft room and put them to good work! Oh by the way I was gonna mention the website that I used for my new background on my blog. I found the neatest place to get backgrounds and banners and they are all free and they give you simple steps of how to change your page. As you all know I need all the help I can get. But anyway here is the link for the site http://www.thecutestblogontheblock.com/

Pies, Pies and MORE Pies!

 On my visit to see my best friend and sis Suzie in Oklahoma this year, she asked me what I wanted to learn to cook this time and I said PIE! So that's exactly what we did and I was so thrilled and excited that I actually did it myself.......with the guidance of Mrs. Betty Crocker herself aka Suzie.
 Here we are....Suzie said that I was a good student......it takes a good teacher to make a good student. Thank you so much there is no way that I could of done it without you helping and guiding me.

 The filling for the chocolate pie! YUM!
 It's topping time!
 Waaaaa Laaaa here is the final product of this pie...a good old fashion chocolate!
 Here we have a pecan pie and a quiche.....Supper and dessert! YUMMMMMY!
And yes we do deliver to one of the sweetest couples in Porum Landing! Jojo and Tuffy loved it....psssst we had to wear our "uniforms" while delivering and had to ride to the neighbors in style...on Suzie's pink golf cart! weeeeeee!!! I still can't believe that I now know how to make pies! I'm so excited about it!