Hi everyone! Here at Candy Creek I decided back in the summer that I was going to live up to the name here with the Christmas decorations this year. While I was visiting Suzie in Oklahoma we went to Hobby Lobby and they already had Christmas decorations out and low and behold if some of those weren't giant candies. Looking back I should of started working right away on the decorations when my feet landed back in Tennessee but I waited up until last month to start anything. But I am just about finished with all of the décor that I will be doing this year even though I still have more ideas...time is something that I'm running out of in a hurry it seems. So without further ado here are some of the decorations for our tree that I've made this year as well as some of the decorations that I've made for outside that I still need to use.

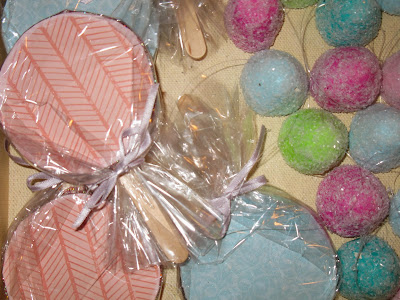
I used air dry clay, acrylic paint and white chunky glitter to make these candies. Oh and of course some cellophane that I found at Dollar Tree. Just for these candies alone it took one large tub of the Crayola air dry clay that you can find at Walmart. I have since purchased 3 more buckets of the largest tubs they sell but will tell you more about what I'm doing with that later on. The "box" that I have my candies stored in is actually a shadow box kit that I had bought from Scrapbuck.com and literally only gave a couple of dollars for. It had some papers, stickers and such in it and I had bought 3 of them and had already made 2 of them for gifts and this was the last one I had. I thought it would be perfect to store the candies for save keeping and they look cute as well. What did Forest Gump say "Life is like a box of chocolates, you never know what your going to get" Well that isn't quite the case here but I did think of that when I was putting all of them in this box.

Here is a close up of the gum drops and whimsical peppermints.
I made these lollipops using some craft sticks, chipboard and around the edges I used some glitter glue and of course the cellophane and little satin ribbon to finish them off.
Of course the tree needed some cotton candy. This is simply some poly fill that I dyed using some red and blue food coloring as well as some acrylic paint. I let that set for about 3 days or more and soak up the color really well then took out of the large freezer bag and let air dry. I used some cardstock to make the cone shape. I also put some of what was left over in small bags and that will go outside in a trunk that I redid this summer. I'm going to have a trunk that will be spilling over with candies on display. I will be sure to show you all that once it warms up just a tad so I can be out in the weather putting it all together.
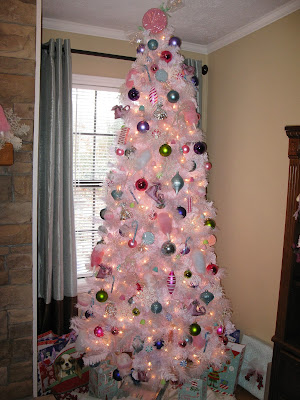
I thought I would take a picture of most of the ornaments that were going on the tree so that you could see the wide variety of colors and things that I would be trimming the tree with this year.
Here is a "Candy Creek" kiss. The tree needed these of course and were super simple to make. Each kiss says Candy Creek instead of Hershey's. I also added 12 real candy canes that I found at Dollar Tree. They are blueberry flavored and we can eat on those long after Christmas is over.
I made some little cupcakes as well. These I used pink felt, Styrofoam balls, seed beads and chunky glitter. They were simple to make as well and I made them in a couple of different sizes.
This is how the peppermints look hanging on the tree.
I made several gigantic wrapped candies as well and decided to use one as the tree topper. I was going to use my gorgeous elf (Beatrice) that Suzie over at Happy Shack made me years ago but I just couldn't get it to look right. (she looked quite uncomfortable too)
And here is our Candy tree. I will be using this theme for many years and each year I will be able to make more and more candies and who knows maybe I will be able to pick up some candy ornaments as well each year to add to it.
To give our tree a whimsical feel to it, I also added the little elf shoes that Suzie over at Happy Shack made for me the same year she made Beatrice. I love them!! They are so much fun! Thank you SUZIE!
Here is our mantle for this year. I'm not finished with it yet. I still have the stockings to make and hang and 2 gumball topiaries will sit on either side of the fireplace. I was able to use the coffee filter wreath again this year and so I was happy about that.
Some of the candies that I used here are actually the cardboard spool that ribbon came on. I simply covered them with cardstock and wrapped them up. I made several of those for outside as well.
You can see more of the recycled ribbon spools here in this picture as well as another "Candy Creek Kiss".
This is what the inside of our fireplace looks like this year. Of course I had to add the snowflakes to the tree as well the other décor. Those were found at Dollar Tree as well and I had most of them from last years decorations. The silver candle sticks were the ones that I found in Monroe, GA when I went junkin' with my oldest brother.
Here is a better shot of the fireplace. Please remember that the decorations aren't complete yet. I still have the stockings to make and finish the gumball topiaries. The gumball topiary is why I had to buy more buckets of air dry clay. It is taking me forever to make those and looking back now I wish that I had used small Styrofoam balls to make them with but it's a little to late now. I am half way done with the first one and it is already quite heavy. I didn't think about the weight before I started rolling out balls. Oh well what is done sure does look pretty so far.
Here are some giant lollipops that will go outside in the trunk.
I also have a few things out in the living room that aren't candy related but when I look at them I can't help but to smile so I added those in. If you would like to read about where the name Candy Creek originated from you can do so by clicking
here
Here is how the candy theme came to be. These pictures were taken while I was in Oklahoma and Suzie and I ran into Hobby Lobby as they were putting out the Christmas decorations...in July!
YUMMMMY!!
I'm not sure if it was the sugar rush or idea of a candy theme this year that caused me to have such an odd look on my face in this picture. Either way......I have felt like a candy factory worker for the past month or so and my ears are starting to get a little pointy as well. I have to admit, I'm running out of steam before I am running out of ideas. If only I could twitch my nose or sprinkle some fairy dust to get more things done. I asked Beatrice for some help but she informed me that her job is to sit and guard the Christmas tree this year and that she was just too pretty to do any manual labor. If you don't believe me here I'll show you a picture of her and where she is right now.

See I told you! The Christmas tree is just to her left. Oh I guess that I should of told you that Beatrice is an elf....and apparently a Diva elf on the Shelf! I've been arguing with her for weeks now about how she needed to help out more around here and she just sits there looking all pretty and grinning at me. Well I best go because she has just informed me that I have been on break for entirely too long and that I will never get all the candy made if I'm just sitting around talking about it. Thanks everyone for stopping by and will be sure to post more pictures as I keep churning out candy.


