Sunday, September 9, 2012

Back to Junkin' and loving it!

Hi all! I thought that I had missed the big Tree Street yard sale this year that is in our area but luckily for me it wasn't until this past weekend. I had such a good time and found some good stuff as well. Mr. Candy Creek went along with myself and another junkin' buddy of mine and even though we were worn to a frazzle by the end of the day, we would of done it all over again. I love this vintage oscillating fan that I ran across.
 Here is a picture of my total loot.....I can't hardly wait to get started redoing some of my finds and fitting them to my liking.
 Not sure if I'll be able to keep my husband off of this sled when the snow starts flying or not. He's been talking about how he rode one as a kid and how he loved it.
   Can't hardly wait to get a liner made for this because it's going to be so nice to use while I'm out junkin'
I just loved these. One of them is a McCoy. They are so sweet.
  I'm a sucker for plates, cups, saucers or anything in the dishware line with roses. And these Watkins cookbooks really caught my eye as well. One is a 1938 and the other is a 1948 and it even has some handwritten recipes in them.
If you've been following my blog for a while you'll know that I have this thing for nest, eggs, birds and such and then the little in is actually a ladies face powder tin with a glass insert in it. It would be darling to use for loose jewelry.
And last but not least. I had to show you how we did the Tree Street Yard sale this year. The big yellow "banana" aka slide wasn't something that came home with us that went with my friend for her grandbabies. This is the second time we had loaded he cart up before we had to go unload before refilling. It doesn't get any better than that!
I went junkin' while I was in Oklahoma as well and will take pictures of my treasures from out there so I can share with you.
Have a wonderful day everyone!

Monday, August 27, 2012

New Hackler Reunion mini album that's not so "mini"

                                       WARNING THIS POST IS PICTURE HEAVY!!!
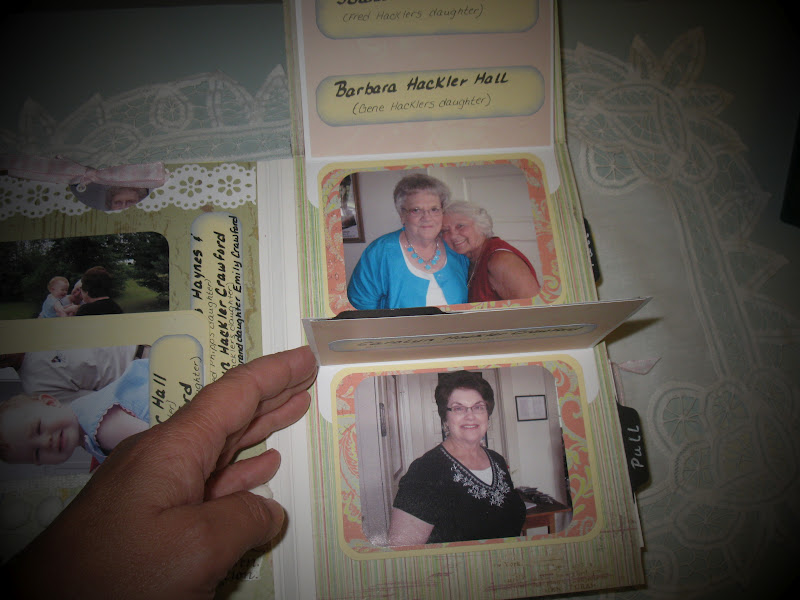
Hey everyone! I know it's been a while since I posted anything and I apologize for that but I've been on the go for it seems like forever now. Life has gotten in the way of crafting. But I did make this mini album for the annual Hackler reunion. This is the second one that I've made for my family to enjoy. Although I refer to this album as a mini album it really isn't small at all. It measures 9"x6 1/2"x2 3/4". It's just a really good size to be able to fill full of pictures which is what I needed in this case. Also I tried not to make it to fancy with lots and lots of movable parts that could get damaged with everyone looking at it. I really tried to make it as simple as possible.
 I used numerous different scrapbook papers from several designers. Here is the side view showing what I used as a closure for it.
 When it's opened up, if you chose to you could leave it as a display with all the pictures showing all the way around. It's just another option if you chose to do so. I took a picture from above to show you.
 Here is what it looks like sitting on display and opened up. I even thought it would be neat to have this on a dowel rod in the center and fix it so that somehow it would spin.
                         Here you can see that I used lots of different embellishments just for fun!

 To make it easier for my family to follow through looking at the album I added tabs and wrote what action they needed to take in order to reveal more pictures. I wrote things like "lift" or "pull".


                     I think that by adding those it made it a lot easier for them to see everything.


As always I enjoyed making the album. Unfortunately, I wasn't able to attend the reunion this year but had my mother take the album to share with everyone for many years to come. So since I wasn't there because I was sick, that means I didn't get any pictures either so that I could make an album for next year. That saddens me because I really wanted to make that a little tradition. But like I said earlier in this post....life has been getting in the way and things happen that are out of your control. I hope that you enjoyed looking at my album. If you would like to know how I put this album together please let me know by leaving me a message in my comment box and I will do a tutorial for you. It was super easy.
Thanks everyone and I hope that you have a great day!!

Tuesday, June 19, 2012

From boys room to Mancave remodel....

 Ok first off since I don't take before pictures and can't seem to lay my finger on the pictures I had taken of my sons bedroom before I will just explain what it looked like before. It had boring white walls but the rest of it was all about camo and hunting. The furniture was 3 different colors all in the "camo hues" and well it was just downright boring all together. It still had footballs posters hanging and even a net in the corner that no longer held toys but instead his collection of ball caps, trucker caps or whatever you want to call them. I had wanted to redo this room for years but he didn't ever want me to do anything. I'm not sure what he was afraid of...lord knows it could only get better than it was. So when I was at my oldest brother house this spring I once again fell in love with blue in his guest bathroom and asked him if he would give me a sample of it because my vision for this room was already developing in my head. Below are pictures of the outcome. There are still a few things that I want to tweek here and there but the major part is done! Can check this one off of my list.
 The big thing in the room was adding the bead boarding on the bottom of the walls. I have always been a fan of that so that was a must! The frames I had collected from my stash. They were boring wood tones but now they are all black...including the mats. Of course I had to rehang his gun rack which is used to hold his bow rather than one of his guns. And even though I'm TOTALLY against hanging dead animals or any part of a dead animal on the walls of the house...my son somehow got away with it but using push pins was no longer an option to hang them. So I remedied that one by "mounting them on artist canvas's that I had painted black. I can take close up pictures of those if you need for me too. Two of my frames are still awaiting pictures that I need from my son where he caught some monster fish recently.
 My son requested that his room be darker so Suzie over at Our Happy Shack suggested a black out roll down shade. It works great...but boy oh boy that thing gave me a fit hanging it. Here you can see that I have it up some so you can see it's there. It really helped with the morning sun that came in right on him. I'm in search of a lamp to for his desk....just another tweek here and there remember....
 We didn't have his tv hung on the wall before. It actually sat on his dresser leaving him even less room to put his stuff. So since we had a surprise visit from Suzie and Don while I was working on the room. They jumped in and helped Mr. Candy Creek out by hanging the tv mount as well as the new ceiling fan that they bought for Austin because his room wasn't getting enough air flow. I also bought some black canvas foldable baskets at Walmart to organize this things in and to clean up the bookcase a bit. They worked perfectly and I need to get one more for his night stand.
 Here is the ceiling fan that Suzie and Don bought. We just love it and are so grateful to Don for hanging it for us!
 I bought the mirror at TJ Maxx (my favorite store in the world!) for only $24. I had originally planned on hanging it a little lower but the trim and bead board wouldn't allow that. My son is really tall and said that he's happy with where it hangs so that's all that matters even though it goes against all normal design rules. The basket on the dresser will soon be in the trash. I'm in search of a long flat basket in black to hold loose change and such.
 If you've been following my blog for very long you will remember that this little table has really made its way around the house. I think it's finally found it's finally resting spot. One more black canvas basket in the bottom and that will be complete.
 I was so happy with the way the furniture turned out. When I first envisioned this room, black wasn't something I had in mind. That was at the request of my son and boy he was right on the money with it. I just love how it all turned out. Hopefully next year will be the year that all of my carpets throughout the house can be replaced. (keeping fingers crossed)
Well that concludes my redo of my son's room....it really went from a little boys room in sad shape to a grown up looking man cave! I am so thrilled with it and he likes it as well.
Have a good day everyone!

Another "file tab" mini using pastels...

 Hey everyone! Remember waaaaay back in March I did a tutorial on how to make this "file tab" album. Well I had done that one in some muted earth tones and loved the album so much that I had to "girly" it up a bit and use pastels this time so here is what I came up with. I've had this made and already given away for some time not but haven't had time to post it on the blog.
 I used several different paper collections and embellishments. I basically just used what made me smile and feel happy. The clasp that I used are heart shaped paper clips and then I just used regular jewelry chain to make them connect and pastel brads to keep them secure. I used a regular paper doiley from the baking section to give it a bit of frill and mod podged over it so it would stay put nicely.
Of course I had to add some more butterflies to the inside and all that it needs now are pictures. I hope that our pastors wife enjoys it and fills it with lots of pictures of her precious little ones.
Have a good day everyone!

Thursday, May 3, 2012

Altered Art using painting canvas...

 Hey ya'll! I've been at it again.....these 3 canvas's have had so much done to them since I bought them that I'm starting to lose track. I had to do something because here it is May and I still had snowflakes on these. So I took another short break from finishing up my spring cleaning to do a little something different. I had wrote this idea down back quite a while ago as Suzie and I were brain storming one night and well...here is the final outcome! Thanks Suzie for you help!
 I apologize for the fact that I didn't write down which paper pads I used on this project but it was literally just ones that I pulled from numerous ones. I was thankful that the canvas's were already "primed" so I didn't have to wait for that to dry. I glued the paper on using a homemade mod podge and then put an extra coat on top to seal it really well and then as that dried I went ahead and started pulling things that I'd like to use that would be 3D as you can see there are keys, butterflies, a Tim Holtz name plate thing. For the paper that is under the words "sings" I had actually found an old songbook at the thrift store last year and simply cut it out, inked my edges and then ran it thru my paper crimper to give it a little more texture.
 I had some scrap papers that had pictures of vintage post cards on it so I just cut those out and inked the edges and added some felt flower borders in black and brown.
 And of course would one of my projects really be my project if I didn't add a little bling of some kind?? uhhh if you really know me then you would all be saying NOOOO! So I found this bling at Michael's on clearance and it even has little bitty butterflies in it as well! But my most favorite thing on all of these pieces is.....
THIS!!! The wings that I added on my son's back. I think these are from Melissa Frances and they are of a resin type material. I was going to use these somewhere else on this canvas and had moved them out of the way while I was arranging things when I looked down and saw where they were laying and well.....it was just meant to be! I'm so thankful that I have another set of these wings because I think that they are discontinued now but I'm going to make a scrapbook page and use the other set of wings for this picture.
Ok so tomorrow it really is back to finishing up my spring cleaning...uhh at least I hope so.

Tuesday, May 1, 2012

Guest room/Craft room gets a little makeover...

 Hey ya'll! As I was working on my spring cleaning I was removing everything from my guest room/craft room so that I could wash all the walls and every thing else in the room, my son's girlfriend walked in and said "oh are you going to paint in here?" and I said no not yet, it's on my list of things to do this summer but I'm just cleaning it right now. So as I walked out of the room with yet another load of things I was removing to place in the kitchen I thought. Boy oh boy Robin your about stupid to have this mess all over the house twice in one year!! Soooo what did I do?? I started painting! I so wish that the colors would show up better in the pictures or that I could find my before pictures that I took several years ago of this room. But I can't seem to locate them right now so I'll just tell you what all I did to it. The walls went from white to a buttercream yellow that is actually called Summertime Shasta Daisy. Now I'm not a big yellow fan but I like this soft soft yellow especially since I painted all of the trim in the room that was just boring ole brown to a starch bright white! And I found a new quilt to go on the bed that has all the pretty pastels that I so love in it.
 My bookcases were originally black so those got painted white and then distressed to make them more shabby. I stacked up my storage boxes in the corner of the room that house all kinds of different craft items and I moved the clear shoe rack thing that originally hung on the back of the door where you walk in to the back of the closet door. It cleaned things up a bit for when we have guests.
 As you can see....I don't have one of those big nice rooms that most of you girls have that is specifically designated for just crafting and sewing but I make do with what I have and it works. I didn't do anything different in this corner other than the fact that I hung a metal shelf to house some of my pretty chipboard letters and embellishments. But I did take my shutters down and repainted those and sanded them to give them that nice shabby chic feel like that I love so much.
The above picture just shows how I have my supplies in my bookcase that I just painted and sanded.
I'm thinking about making some little curtain inserts to fit the fronts of my bookcases so that guests don't have to see all my supplies on the shelves. But that can always be a project I can go back and take care of later.
Painting the room slowed my spring cleaning down a bit and now so has the stomach virus that I've picked up but I look forward to getting the other rooms finished so I can get to more projects. I plan on redoing my sons bedroom as soon as I finish the spring cleaning and am actually looking forward to it.
Have a great day everyone!